Inserting Articles (pCon.planner Pro)
|
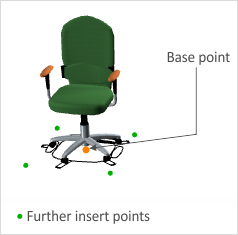
1.Click B2B Catalog on the Start tab. 2.Load the desired article into pCon.planner Pro by clicking on it in the relevant catalog. 3.Each such article will first be attached to a pre-defined base point (see screenshot on left). The x and y keys can be used to select different insert points if these are available. 4.Clicking will then fix the position of the article. |
5.The next thing to do is to use the keyboard or move the mouse to decide on the rotation of the article.
6.The insertion procedure is concluded by a click or by confirming with Enter.
Inserting the article repeatedly
1.Select an article by clicking on it in the catalog.
2.While the article is hanging on your cursor for insertion in pCon.planner, press R. Alternatively, right-click to open the context menu and select Repeat Insert.
3.Define the position of the article.
4.After inserting the first article, the same article will continue to hang on your cursor.
5.Insert the desired number of copies and finish the process by pressing Esc.