Rotated Dimensioning
Start this type of dimensioning from the ![]() icon in the Dimensioning menu, Dimensioning group, Edit tab. The tool enables you to dimension objects after an angle has once been specified in a linear orientation, as shown in the illustration below.
icon in the Dimensioning menu, Dimensioning group, Edit tab. The tool enables you to dimension objects after an angle has once been specified in a linear orientation, as shown in the illustration below.
Use
|
1.Having started the tool, establish the initial point of the first length to be dimensioned (see image: starting point of dimensioning). 2.Now move the mouse to the endpoint of the length for dimensioning and click to fix that point (see image: endpoint of dimensioning). 3.Now move the mouse and set the angle of dimensioning (see image: angle of dimensioning) which is relevant to the current dimensioning procedure. |
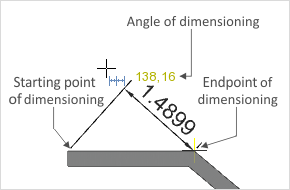
4.The angle can be fixed with a click. 5.By moving the mouse, you can set the distance between the dimension figure and the object it applies to. Alternatively, enter the distance in figures and confirm with the Enter key. Step 6 will not then apply. 6.Now fix this distance by clicking the mouse. The tool will stay active until you deactivate it using the Esc key or the Cancel context menu item. |