Scale
The size and proportion of objects is changed by means of the Scale tool.
Objects are either scaled by using their interactors, by changing the dimensions of these objects via a defined distance or by means of the Transformation area in the Properties Editor.
Using Interactors to Scale
Mark the object to be scaled and select the Scale item in the Tools group, Edit tab. The object will now have dots at its corners. These are scaling interactors. Click on one of these interactors and move the mouse. As you can see, depending on mouse position, the scaling can be carried out in one or in two dimensions or with the proportions maintained. A further mouse click will conclude the scaling process. As an alternative to changing the size with the mouse, you can use the keyboard to set real values.
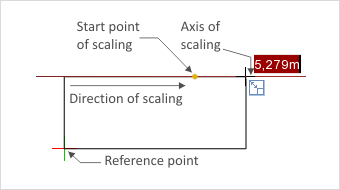
The screenshot on the left shows how to scale a rectangle using an axis of scaling. Axis snap makes it possible to enlarge the element in one dimension only. In the right-hand screenshot an axis of scaling is also used, but here the Axis Snap has enabled proportionate enlargement.
If you are hoping to scale entirely freely, it is advisable to deactivate Axis Snap either using the appropriate item from the context menu or by pressing G.
|
|

Scaling Using a Length
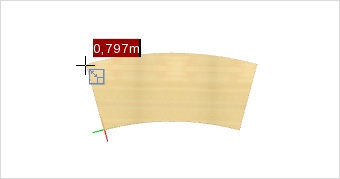
Scaling in this way is based on a length which is to be changed. This method can be used to scale objects by means of enlarging a single edge. It is also suitable for the scaling of floor plans. By using a wall with a known length as reference, the whole floor plan can be enlarged to scale. The procedure is demonstrated in an example. There is a table in the design. The task is to enlarge the whole table by setting a length for one of its edges. First the table is selected and the Scale tool started by clicking the appropriate button.
Note: In order to scale an object using a length, the scaling interactors have to be deactivated. They can be switched of by clicking on the Hide Scale Interactors entry in the context menu.
|
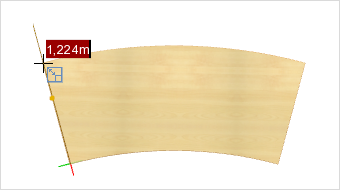
The mouse is clicked on the lower left-hand edge of the table surface to set the start point of scaling. Now a length is marked by dragging to the upper left corner of the table surface and there the end of the length is set with a mouse click. The edge marked in this manner is 0.797 m in length. The intention is now to enlarge the table in such a way that the measured edge is 1.224 m long. |
|
By moving the mouse the previously measured length can be stretched along the scaling axis visible on the left of the image. This makes the enlargement apply to the size of the entire table. By either clicking the mouse or entering a value (and confirming with Enter) the scaling procedure is concluded. |
Transformation Area in the Properties Editor
A selected object can also be scaled via the Transformation area in the Properties Editor. The Dimensions area allows scaling elements with respect to the three axes of the coordinate system.
1.Select the element (or multiple elements) that you want to scale.
2.In the Properties Editor, click on the Common tab.
3.Enter the new dimensions in the Dimensions area. Width, Depth as well as Height can be altered here.
4.Confirm the new values with ENTER. Alternatively, press the TAB key. In this way, the value is confirmed and your cursor jumps to the following input field at the same time.
Multiselection enables scaling multiple objects at once. The newly entered measurement refers to each individual object. Articles with commercial information are not scalable via the Transformation area.