Line up
Distribution Along a Straight Line With a Set Distance Between Two Objects |
The Line up tool allows any number of repeat objects to be created within a drawing. Here it will normally be Standard Copies which are produced. However, the tool can also be used to produce Reference Copies.
The Line up command enables objects to be set out either in a straight line or in a circle. Below, both options are demonstrated. There are two ways of distributing objects along a straight line: you can either define the distance between each object and the next (Distribution along a straight line with a set distance between two objects) or you can set a distance over which a certain number of objects is to be distributed (Distribution along a straight line using Start/End mode).
Distribution Along a Straight Line With a Set Distance Between Two Objects
First select the object from which a row is to be produced and activate the Line up tool: the button is in the Tools group, Edit tab.
|
|
|||
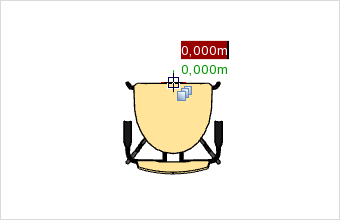
1. |
The first thing necessary to do is to define an axis, using two points, along which the objects are to be lined up. The first of the two points is set with a click of the mouse. In the screenshot on the left, this point is at the center of the upper edge of the chair. The reference point is positioned there, to enable the distance between the repeat objects to be defined in the following stages. |
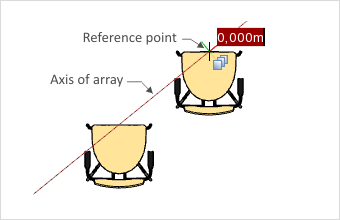
2. |
Now the second point to be used for alignment is placed wherever you want it in the viewport. For this, move the cursor to the position desired, or type in the figures on the keyboard. Now fix this point with a click of the mouse or by pressing the Enter key. The point used in the example is at a distance of about 1 m and an angle of 45°. |
|
|
|
|||
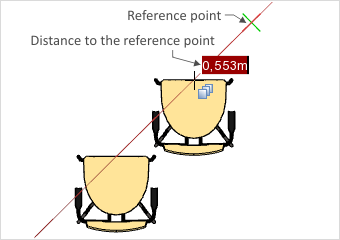
3. |
Having defined the axis, you can stick to the distance already set or move the object along the axis you have drawn. The distance you thus define will be that between each pair of objects in the row. In the example, the distance has been slightly reduced. The final distance between the objects is fixed by clicking the mouse or using the Enter key.
|
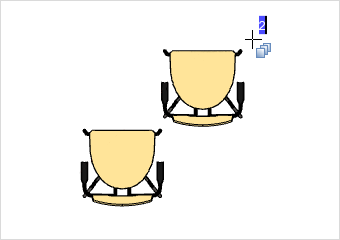
4. |
You can now determine the overall number of copies of the object. The default setting is always 2 (see screenshot on left). You can also decide whether the row is to be a row of standard or reference copies |
|
a) b) |
To create standard copies simply enter the number of objects you require and confirm with Enter. To create reference copies enter the number and select the Create reference copies entry from the context menu. Confirming with Enter will produce the row. |
|||
Distribution Along a Straight Line Using Start/End Mode
With this option, any number of objects can be generated along a notional line and evenly distributed along it. Both the start point and the endpoint can be freely chosen. The setting of the guiding points (steps 1 and 2) is the same in this method as in the example above. Step 3 onwards is as follows:
|
|
|
||
1. |
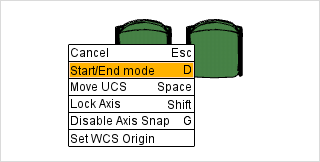
After defining the directional points, the software asks what distance is to be maintained. Now open the context menu with a right mouse click and choose Start/End mode. |
|
2. |
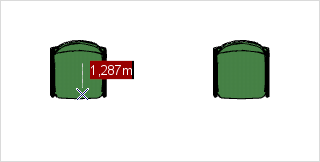
In the next step you can set the end point of the area within which the objects are being set out. Move the cursor to the desired position and confirm with a left mouse click, or use the keyboard to enter the distance between that position and the start point. |
|
|
|
||
3. |
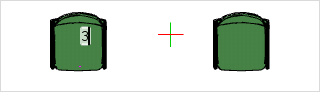
Insert the number of objects to be evenly distributed within the desired area. |
|
4. |
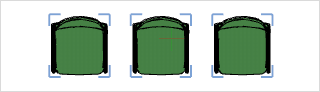
The objects are created and distributed automatically by the software. |
To create reference copies, select the Create reference copies entry from the context menu before confirming with Enter.
Circular alignment can be started by means of the context menu or when the user presses C on the keyboard after the Line up command is called up.
|
|
|
|
|
|||
1. |
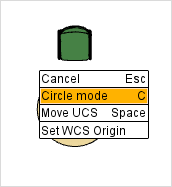
Use a right click to open the context menu and click on the appropriate menu item to start Circle mode. |
|
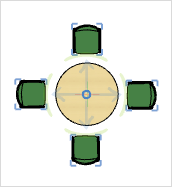
2. |
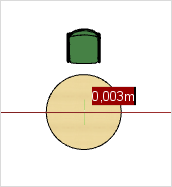
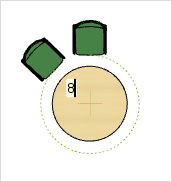
Select the center of the circle you have in mind for the alignment of the objects, confirming it with a left click. |
|
3. |
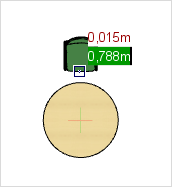
In this third step, you can use a left click to select a reference point on the object to be copied that serves as definition of the cursor position for the ensuing area selection (see also 4). |
|
|
|
|
|
|||
4. |
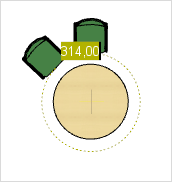
Define the circle or the arc which is to be used for the Line up command. To do this, place the object in the position desired or enter an angle (in degrees – a full circle is 0° or 360°). |
|
5.a) |
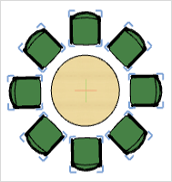
As a last step, you can specify how many objects should be equally distributed in the area selected. Insert the desired number of objects and confirm it by pressing the ENTER key. |
|
6.a) |
After this the software will place the desired number of objects automatically along the arc you have set or round the complete circle. |
As an alternative to setting a number of objects for uniform distribution, it is also possible to set a distance between the objects by entering an angle in degrees. This spacing taken in account, as many objects as possible will then be distributed around the circle or arc that has been defined. This alternative and how it works from step 5 onwards is shown here.
|
|
|
|
|
|||
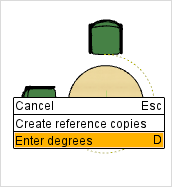
5.b) |
Open the context menu with a right click on the mouse and select the last of the items, Enter degrees. |
|
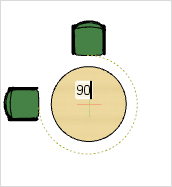
6.b) |
Now enter the desired distance between objects as an angle in degrees. |
|
7.b) |
The software will place the objects automatically, taking account of the spacing set. |
To create reference copies, select the Create reference copies entry from the context menu before confirming with Enter.