Advanced Settings for Image Rendering with OSPRay
Note: On our Youtube channel you will find a video on this topic |
||
|
|
Do you want to create impressive renderings in pCon.planner but don’t know where to start? No problem! Whether you’re a beginner or just looking to refresh your skills, this basics tutorial will guide you step by step on how to render single images and showcase your designs perfectly. |
|
|
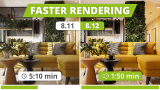
In this video, we’ll walk you through three typical interior scenes to show how the new rendering performance compares directly to the previous version. You'll also learn what role the CPU and graphics card play – and what to look for in your hardware setup to plan smoothly and render quickly. |

Note: Please keep in mind that your CPU must have at least SSE 4.2 if you want to use OSPRay in pCon.planner. The use of the GPU for image rendering is not supported by the OSPRay version integrated in pCon.planner.
With OSPRay you render interactively.
You can change several settings during the rendering process without having to restart it. These settings are:
•Stopping conditions
•Output as HDRI image
•Tone Mapping
These additional setting changes will restart the rendering process:
•Camera Type
•Ray Depth
•Contribution Threshold
•Light Calculation
•Stopping Condition Custom: Variance Threshold
•Keep Lines: Use Fixed Line Color
You can change these settings after the image rendering process is complete:
•Use transparent background
•Output as HDRI image
•Tone Mapping
•Denoising
Image Background and Lighting when Rendering with OSPRay
OSPRay uses the background settings from the real-time view. You can find these in the Environment dialog under the View tab. In the Environment dialog, set background panoramas, settings for ambient lighting, etc. have an effect on the plan view as well as in the photo-realistic images.
Setting |
Background |
Stopping Condition |
Here you can adjust at which image quality the rendering process should be stopped. For Preview, Medium or High, the rendering process will automatically stop as soon as the given level of quality is reached. If you set the level to Unlimited, the image rendering will continue running until you click the Stop button in the upper left corner of the Image dialog. Use the Custom level to set an own variance value as stopping condition for the rendering. |
Variance Threshold |
Available for Stopping Condition: Custom. Statistic value of the remaining noise within the image. The smaller the value the higher the image quality. The value runs towards 0. We recommend the value 1.5. |
Ray Depth |
Ray depth for path tracing. Refers to how often a single ray of light is reflected within the scene. It is recommended to keep the preset value. Closed scenes with little illumination benefit from a high Ray Depth. An example would be the illumination of alcoves within a complex office layout. |
Contribution Threshold |
A low value prevents aliasing effects in strongly illuminated image areas. Low values also reduce the contrast within the image. |
Light Calculation |
Accelerates image rendering by defining the number of light sources taken into account for each render pass. Levels: •Truncated: Uses just one light source per render pass. Very quick setting, produces hardly any difference to higher settings for simple lighting scenarios. •Simple: Sufficient for most lighting scenarios. •Medium: Default setting. Is used for medium complex lighting scenarios. •High: Only needed for complex lighting scenarios. •Maximum: Uses all light sources in the scene for every render pass. Slowest setting, only recommended for specifically complex lighting scenarios. Note: The results depend on the lighting situation and the overall complexity of the drawing. Light Calculation will not have an effect if there are no additional light sources used in the drawing besides the Ambient Light. |
Transparent Background |
Determine whether or not the background should be transparent. |
Create HDR Image |
The rendering will be displayed as an HDR Image (High Dynamic Range Image). |
Select the method for the adjustment of the color range within an image for the display capacity of conventional monitors, so that the rendered result appears as natural as possible for the viewer. Here you can select from Simple, Filmic, Drago and Reinhard. Filmic is the default method. Filmic, Drago and Reinhard compress the contrast range more in bright areas of the image than in darker sections. In comparison to Simple, these processes generate more dynamic images. The method Simple uses a simple procedure to filter out all color values that are too bright for a conventional monitor. |
|
|
|
|
Filmic |
Simple |
Drago |
Reinhard |


Architectonic Camera |
If this box is disabled, the default camera will be used. The image will be calculated in a real perspective. If you check the box for the architectonic camera, the perspective view will be straightened out so that all vertical edges in the plan are also displayed vertically in the rendering. |
Shadow Plane |
When this option is enabled, a transparent plane is placed on the zero level. This generates a realistic shadowing underneath individual 3D models. This option can be used to create photo-realistic visualizations for free-standing products. The image background will contain the shadowing for the depicted object. •We recommend setting the Background to Transparent for this feature. By doing this, you can use and further process the generated product images in other image editing programs as well as integrate them into other scenes. •It is also advised to set the Tone Mapping to Simple. •Please keep in mind that the product model should be placed at the zero level in accordance with the World Coordinate System. |
Lines/Keep Lines |
This setting means that during the photorealistic rendering of an image, not only are the spatial objects and surfaces considered, but the lines and 2D drawing primitives as well. These will be visible in the rendered image. You could also input a Line Width Factor, which will be multiplied by the line width and will influence the width of the lines in the printing result. |
Use Fixed Line Color |
Available when Keep Lines is activated. Set a homogeneous color value for all lines in the image. |