Layers
Objects, whether 2-dimensional or 3-dimensional, are usually created in matching layers. The visibility of the objects in whole or in part can be controlled using the Layer Filter and the Layer dialog. The Layer Filter is to be found in the Visibility group on the Start tab, the Layer dialog (![]() ) can be found on the Toolbar. Each can be configured to apply either to the whole design (i.e. globally) or simply to the viewport currently active. The layer management functions are available in the design area and in the Layout area.
) can be found on the Toolbar. Each can be configured to apply either to the whole design (i.e. globally) or simply to the viewport currently active. The layer management functions are available in the design area and in the Layout area.
|
Open the Layer dialog by clicking on the Layer icon on the Toolbar. Various options come up for selecting and sorting layers – see the following screenshot. If no settings have yet been made in the Layer dialog, it will always show all the layers in a design. |
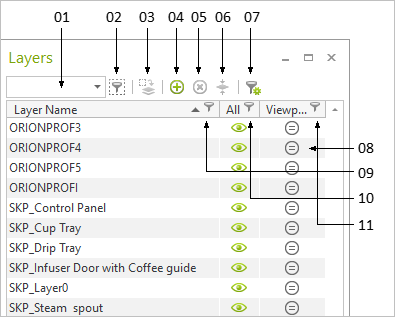
01: Quick Filter 02: Filter layers by selected objects 03: Mark Layers of selected objects 04: Create a new layer 05: Delete all objects on highlighted layers 06: Hamburger Menu Contains the following options: 07: Merge layers 08: Purge Deletes all unused layers. 09: Filter Designer 10: Open context menu |
Every object in a plan is assigned to a layer. There are several ways to change the assignment:
Option |
How to proceed |
Properties Editor |
1.Select the object(s) that you would like to assign to a layer. 2.In the Common tab in Properties Editor, you will see the drop-down menu Layer. 3.Select the desired layer from the list. |
Drag&Drop |
1.Select the object(s) in the plan that you would like to assign to a layer. 2.Hold down the left mouse button to drag the object to the desired layer in the Layers dialog. 3.It will now be assigned to this layer. |
Context Menu |
1.Select the object(s) within the plan that you would like to assign to a layer. 2.Right click on the desired layer within the Layers dialog. This opens the context menu. 3.Click the Assign entry in the context menu to assign the objects to this layer. |
Merge Layers |
1.Open Layers dialog. 2.In the Layers dialog, select the layers for which you want to define a common layer. 3.Open Hamburger Menu. 4.Click: Merge Layers. 5.A new dialog opens. Select the new layer and confirm by clicking OK. Notes: •Merging layers is recommended for clearly structuring your planning before exporting it to other CAD applications. The visibility control for objects in finished plans can also be greatly simplified by merging layers. •Background: After merging layers, the previous layers of the objects are deleted. However, the layers are restored during planning actions (inserting a new object, editing an object on the target layer). •Example: 72_EGR_ROOM5_D3_WALL and 72_EGR_ROOM5_D3_WALLELEMENT are merged to the new layer 72_EGR_Room5_D3_ROOM. Subsequent change of a wall height > 72_EGR_ROOM5_D3_WALL is available again in addition to 72_EGR_Room5_D3_ROOM. •The layer 0 cannot be deleted. It can only serve as a target layer for merging layers. |
Controlling Visibility Using Symbols
|
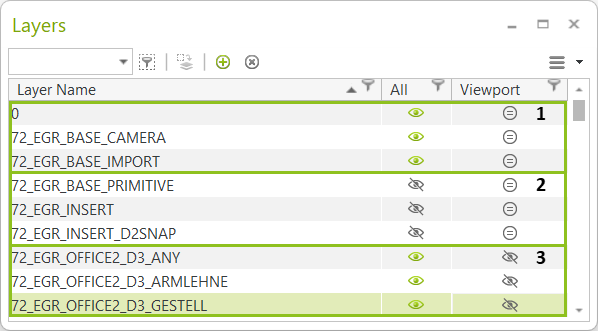
The clickable symbols in the Layer dialog serve to control the visibility of all the layers (symbols in the All column) or of the layers in the active viewport (symbols in the Viewport column). The settings shown in the areas contained in the frame in the left-hand screenshot are explained below. |
|
Global (All) |
Viewport |
1 |
Visible |
Global settings are used, layers are visible |
2 |
Not visible |
Visible |
3 |
Visible |
Not visible |
Working with User Defined Layer Filter
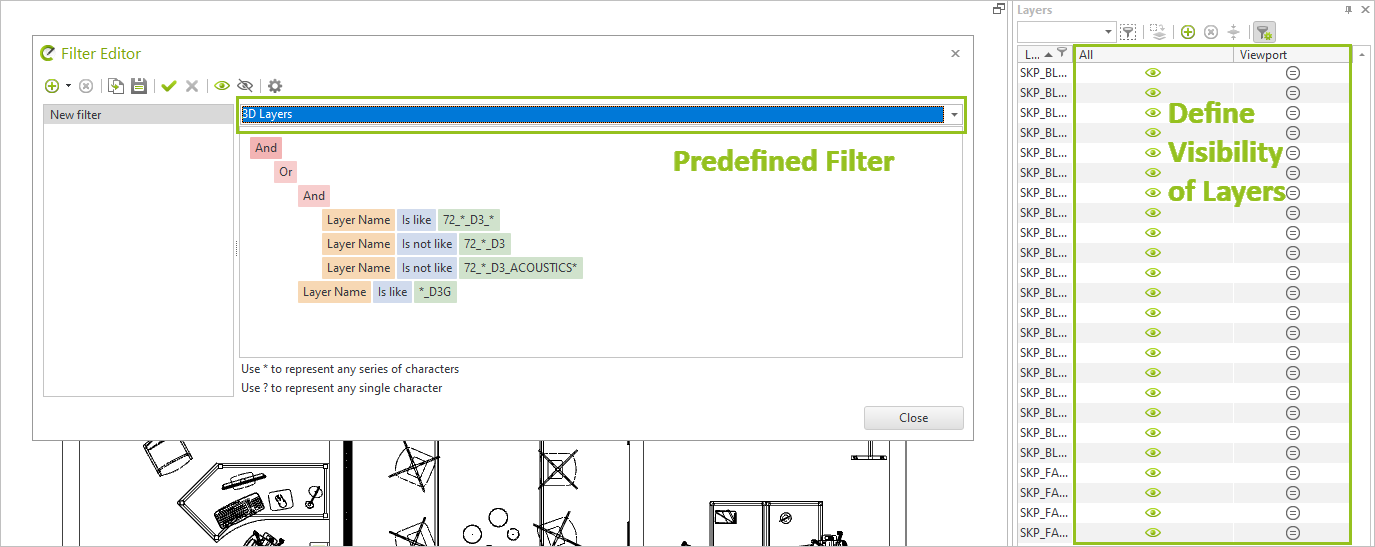
The Filter Editor is a tool which enables the user to create individual quick filters for layers. A filter consists in any number of conditions which can be organized in groups and linked by means of logical operators. Depending on how the filters are defined, the visibility of one or any number of layers can be regulated. Open the Filter Editor as before using the button in the Layers Dialog (see here).
Filter Editor Toolbar
|
Create a new filter. |
|
Delete the selected filter. |
|
Duplicate the selected filter with all its conditions. |
|
Save the changes made to the selected filter. |
|
Apply the filter to the layers in the layer manager. The consequence of this is that only layers to which the filter conditions apply are shown in the list of layers. This means that the result can be checked even during the creation of the filter. |
|
Delete the filter currently applied to the layer manager. |
|
Enable the visibility of all layers to which the filter conditions apply. Objects on these layers will then be shown in the design area. |
|
Disable the visibility of all layers to which the filter conditions apply. Objects on these layers will then be hidden in the design area. |
|
Select a directory in which all filters are stored as files in the form of *.flt. |
Using Predefined Filters
Creating a Filter Root
Operator |
Meaning |
AND |
Both conditions must be fulfilled. |
OR |
At least one of the conditions must be fulfilled. |
NOT AND |
Only one condition may be fulfilled. |
NOT OR |
Neither of the conditions may be fulfilled. |
1.Create new filter (![]() ).
).
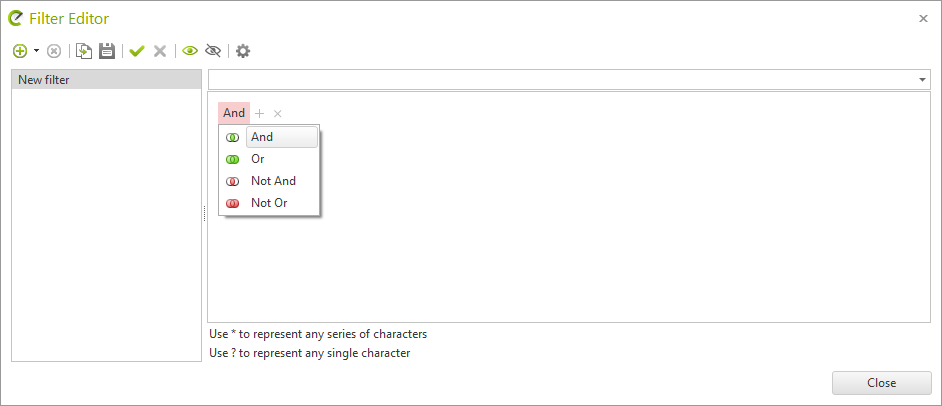
2.Click AND to open drop down menu where a filter root (operator) can be selected.
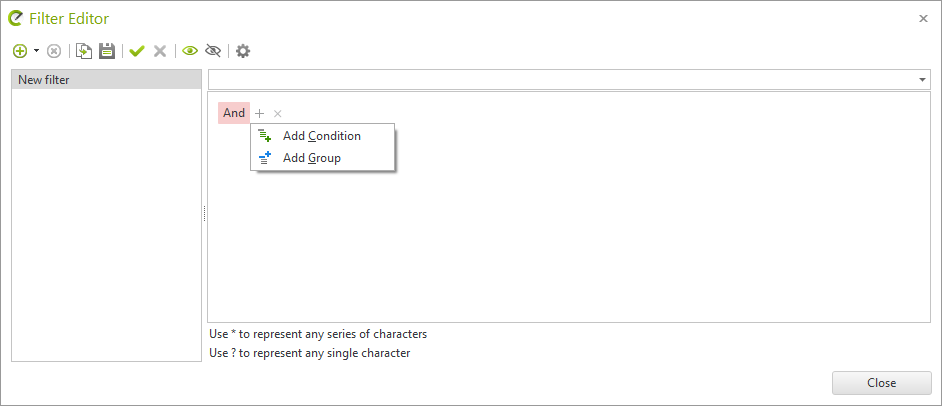
3.Click + for new conditions or groups.
Condition: Property of the layers to be searched.
Group: Close description of a condition through additional subordinate conditions.
4.Click ![]() to apply the layer filter in the Layer dialog.
to apply the layer filter in the Layer dialog.
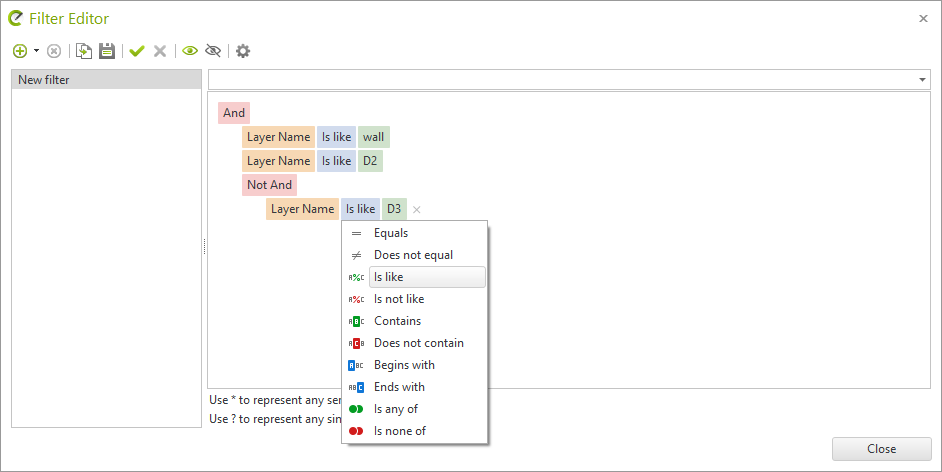
Click on... |
Setting |
Red field |
Set an operator (and, or, not and, not or) |
Green field |
Change layer name/part of layer name |
Blue field |
Specify whether the entry in the green field represents e.g. the entire layer name, the beginning of the layer name or a part of the layer name etc. |
|
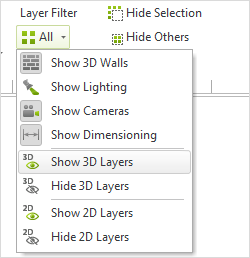
The Layer Filter is opened by clicking on the button of the same name in the Visibility group on the Start tab. The Layer Filter enables you to hide or unhide certain layers of the design quickly and easily without reverting to the Layer dialog. There is a global Layer Filter (i.e. the All button in the Start tab, Visibility group) as well as a Layer Filter for the active viewport (the Viewport button in the Start tab, Visibility group). The Layer Filter menu also gives you access to your user defined filters. |