Overhead Doors
There is the option of adding overhead doors to a wall from the Wall elements category.
|
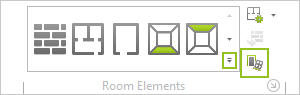
1.Switch to the Room group, Start tab and click on the arrow circled in red in the image on the left. The best projection to use for these insertions is Top. 2.When you click on the arrow, a menu will open from which you can select the Overhead door item with a click. |
|
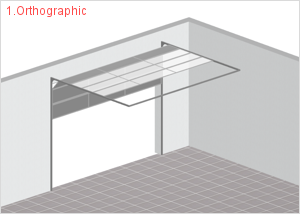
3.The overhead door selected must now be inserted into a wall. To do this, move the mouse onto the desired wall and click where you wish to insert the door. |
To insert yet another similar wall element, simply press the F2 function key.
Editing a Overhead Door
The following table lists the various properties of overhead doors and how they can be modified.
Gates Properties |
Can be edited by means of |
Height |
Dimension figure on the object, Properties Editor, interactors |
Width |
Dimension figure on the object, Properties Editor, interactors |
Position |
Interactor |
Lateral distance from neighboring objects |
Dimension figure on the object |
Parapet |
Properties Editor |
Opening Height |
Properties Editor |
Type |
Properties Editor |
Door Track Type (only for Sectional Door) |
Properties Editor |
Row/Column Count (only for Sectional Door) |
Properties Editor |
Frame Thickness (only for Sectional Door) |
Properties Editor |
Name |
Properties Editor |