Railing
One of the Additionals that you can plan from the room elements link is railing.
Creating a Railing
|
1.Change over to the Room Elements group, Start tab, and open Additionals by clicking on the downward pointing arrow. 2.Now click on Railing. 3.Go into the viewport and click to establish the start point for the railing. 4.Now set the angle and length either by moving the mouse or entering the figures on the keyboard. 5.Another click or pressing the Enter key when the values for length and angle have been typed will fix the railing. |
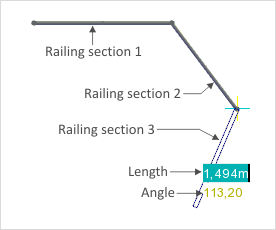
This drawing operation can be repeated as often as you like. The finishing point of the previous section will always be the starting point for the following section (see image above).
If you are drawing a section of railing and, with its endpoint, touch the starting or finishing point of another section and then click, the drawing procedure will be concluded. In addition, each drawing operation can be aborted by pressing Esc or selecting the Cancel item from the context menu (right click).
Editing a Railing
It is possible to edit the properties of a railing. Before this is done it must first be selected.
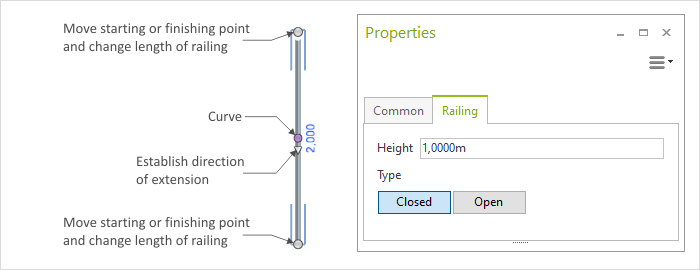
Railing properties |
Description |
Can be edited by means of |
Height |
Height of railing |
|
Type |
Toggle between closed and open railing |
Properties Editor |
Name |
It is possible to give a Name to any railing |
Properties Editor |
Length |
Length of the railing section |
Dimension figure on the object, Interactors |
Curve |
Curvature of the railing |
Interactor |
Direction of extension |
Direction in which the length of the railing is extended |
Interactor |