Room Stamp
One of the Additionals that you can plan from the room elements link is Room Stamp. This tool will calculate the circumference and area of closed areas automatically.
Note: The Room Stamp can be used in closed rooms (consisting of single Walls or created with the Rectangular Room tool) as well as with closed, traced Floor Plans as well as areas created with the Split Room tool. |
|---|
Creating a Room Stamp
How a stamp is made is demonstrated by an example. Before using Room Stamp, it is recommended that you change to the Top projection.
|
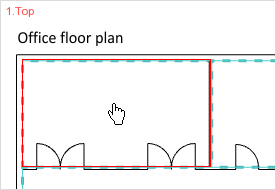
1.Change over to the Room Elements group, Start tab, and open the menu by clicking on the downward pointing arrow. 2.Now click on Room Stamp. 3.Move the cursor onto the field or room for which you want the circumference and area to be calculated. As shown in the screenshot on the left, this will now be marked in red. |
|
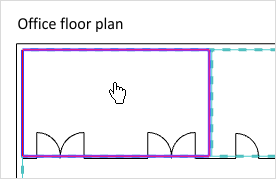
4.A further click in the area to be measured causes it to be surrounded with a purple frame, see screenshot on left. 5.The area is now selected. If necessary, you can click on other areas in addition. All areas selected will be framed in blue. The calculation shown below refers to all areas framed in blue. |
|
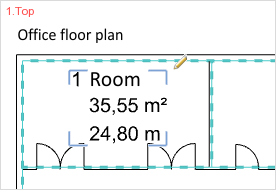
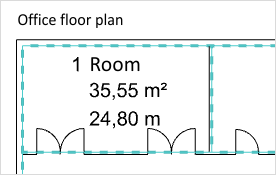
6.Pressing the Enter key calculates the relevant circumference and area. 7.The values calculated are “attached” to the cursor and can be placed anywhere you choose in the design.
Like all objects, the Room Stamp can be rotated and moved. There is also the possibility of editing the text. This is how: |
|
1.Click on the text to select it. 2.The Text tab appears in the Properties Editor. 3.Edit your text as needed. Content changes are applied when you click into your planning from the text field. |