Article Explorer 2: Functions (pCon.planner Pro)
It is possible to make use of the functions of the Article Explorer by means of buttons, by a right mouse click, the use of the context menu, and sometimes by keyboard shortcuts.
|
|
Create a new folder (F7) |
|
|
Delete selected folders (Entf) |
||
|
Move selected items to the other side (F6) |
||
|
Move selected items upwards (Ctrl + Up) |
||
|
Move selected items downwards (Ctrl + Down) |
||
|
Move selected articles to active folder |
||
|
Select marked articles in the drawing |
||
|
Mark selected articles in the Article Explorer |
||
|
Show dialog for automatic reference number creation |
||
|
Update selected articles with the current product data |
||
|
Displayed filter row |
||
|
Switch panel view: one panel/two panels |
||

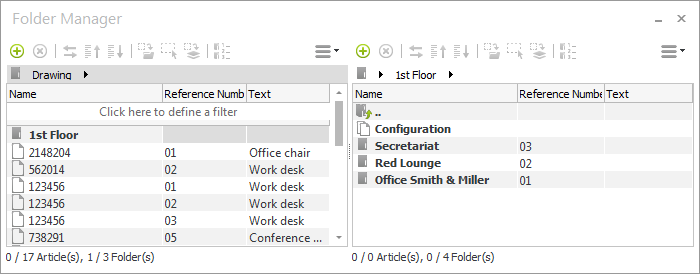
To create a folder, click on the button with the “plus” sign or press F7 or go into the context menu (right click, menu item New). To continue using the example given above, first a folder is created with the name 1st Floor, then this is opened with a double click and then the directories for Office Smith & Miller, Red Lounge and Secretariat are created.
A folder which has been selected can be deleted by clicking on the button with the x-symbol, by pressing the Delete key on the keyboard or by going into the context menu (right click, Delete menu item).
It is, of course, possible to delete several folders at once. To do this, follow the usual Windows procedure, marking them by a left click while the Ctrl key is held down.
Deleting a folder which contains articles moves the relevant articles to the next higher level of your folder structure. It is only possible to delete articles themselves within the drawing – not in the Article Explorer.
Converting Folders to Set Articles
Sets are another type of element that behaves similarly to folders and articles in functional terms. The set features that have been entered into the Properties Editor will be displayed and can be modified in the Article Explorer. The articles assigned to the set can be called up as sub-elements.
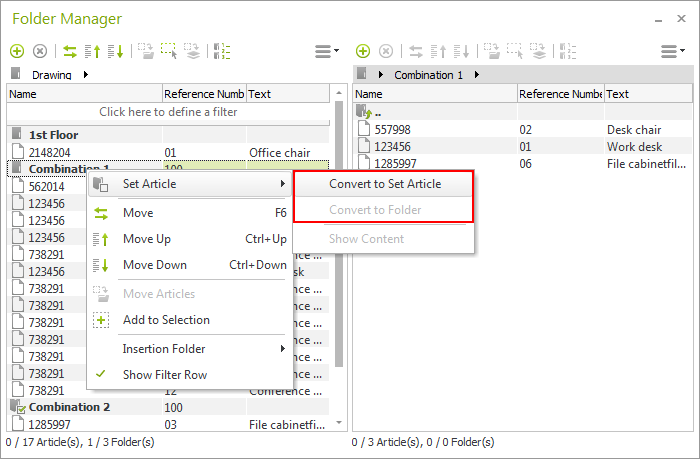
In the Article Explorer, not only textual alterations can be made to the sets, but also sets can be created and deleted. The function Convert to Set Article can be used to convert a selected folder together with all the articles it contains into a set and this function is to be found in the context menu.
The conversion can also happen in reverse, i.e. from set to folder.
|
To make the distinction between Set Articles and ordinary folders easily visible, sets are shown in the Article Explorer with their own symbol attached. A blue checkmark against a folder symbol indicates that this is a Set Article. |
Storing Items in the Article Explorer
Initially, all of your Articles are placed in the root directory (Drawing). When folders have been created, the articles from your drawing can be assigned to those folders. There are two alternative ways of doing this. Both are described in the two subsections below. It is also possible to assign articles to a predetermined directory as a default. The way to do this is described later, below.
Storing Marked Articles in the Active Folder
1.Open the folder into which you wish to place the article from the drawing by double clicking on it (in this example, Office Smith & Miller). 2.Select all articles in a drawing that need to be placed in the folder. 3.Then click on the symbol that represents the Move selected articles to active folder function (see red frame in next screenshot).
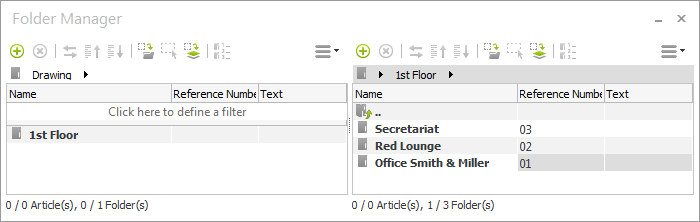
The procedure here described will work for moving all articles into their appropriate sub-directories. If steps 1 to 3 are used in the same manner for Red Lounge and Secretariat, the result will be as follows (see next screenshot).
Thus, in the uppermost directory (Drawing), there will only be a single folder (1st Floor) and this in turn will contain the sub-directories to which the various articles have been assigned. |
Using Drag&Drop to Store Articles
It is also possible to assign articles to a set or to delete them from a set very conveniently using the Article Explorer. The articles are dragged into the set or dragged out of it. It is also possible to assign articles which have been selected in the design, just as in the case of folders.
When you insert articles into a drawing, they will first be placed automatically into the uppermost directory (Drawing) of the Article Explorer. Drawing is, the default directory for storage. You can define a default storage folder for yourself. This is how:
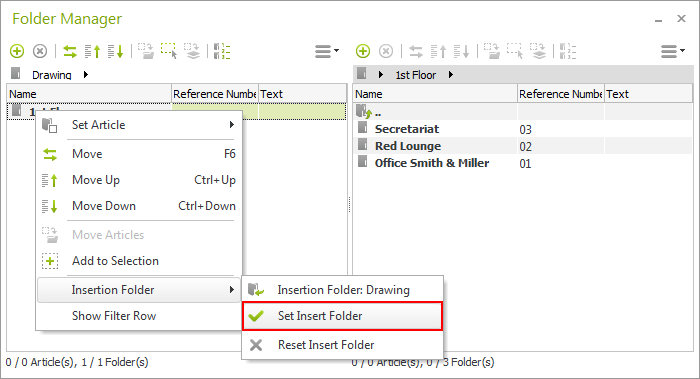
1.Select the folder which you wish to use as the folder for insertion. 2.Open the context menu with a right mouse click and select the menu item Insertion Folder and then the entry Set Insert Folder. |
|
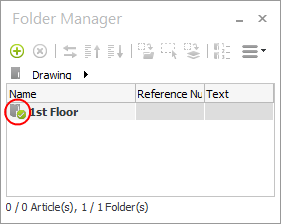
The directory will then be marked in the Article Explorer with a special icon to denote that it has been set as insertion folder (see screenshot on left). It is, of course, possible to change the insertion folder at any time. Simply select a different folder and follow step 2 of the above description again. The Reset Insert Folder entry has the effect of restoring the uppermost directory (Drawing) as default insertion folder. |
Moving Articles Within the Article Explorer
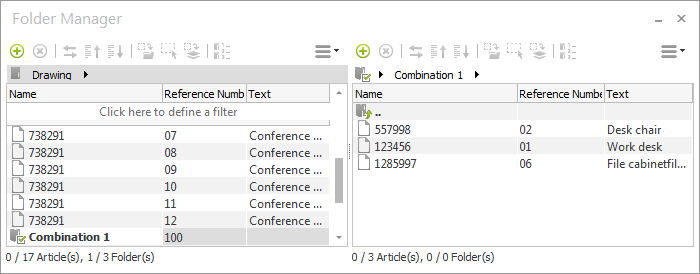
To move articles, single articles within Set Articles or folders in the Article Explorer you must first select them. Then you can choose between using the double arrows button (see shot below), the F6 key or drag and drop to move them into another folder.
It should be noted that the “move” function will not work within a group of articles or a configuration.
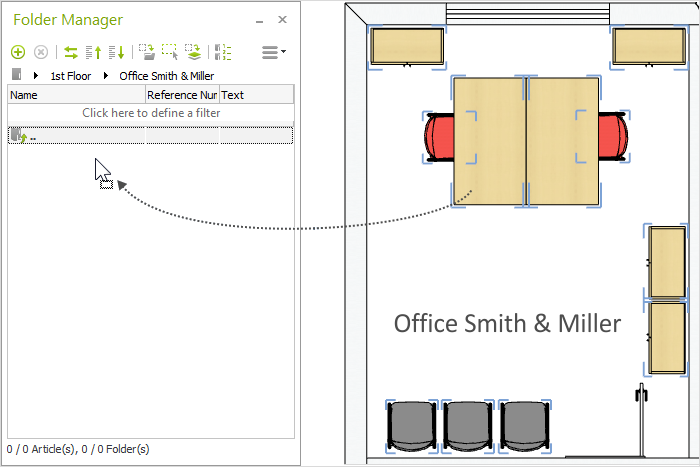
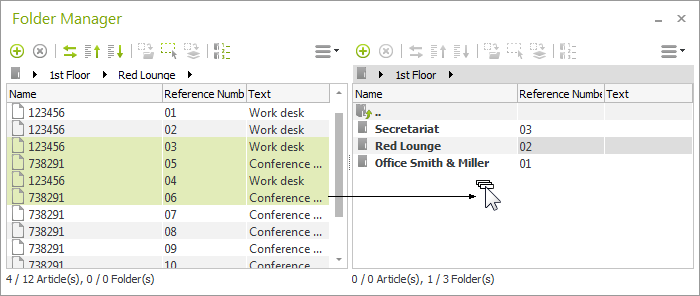
To use drag and drop to move articles, click on the articles or folders selected, hold down the mouse button and move the cursor onto the other side of the Article Explorer, then release the mouse button (see next screenshot).
It is also possible to assign articles to a folder directly using drag and drop, without opening it first. As with the procedure described above, the Ctrl key should be held down while the mouse is moved.
If you release the mouse button when it is exactly over a particular folder the articles selected will have been inserted into that folder.
Fixing the Position of an Article
In the Article Explorer, the order of the articles, Set Articles and folders will later be adopted for the list of articles exactly.
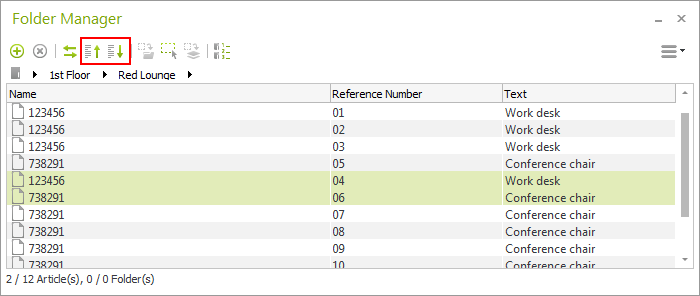
The options Move up and Move down (see highlighting in the following image) changes the order of the selected positions. One or more entries can be selected before the relevant arrow button is used.
Selecting Marked Articles in the Drawing
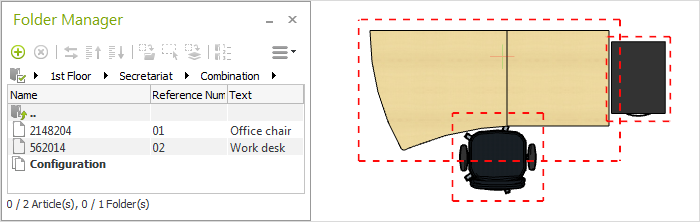
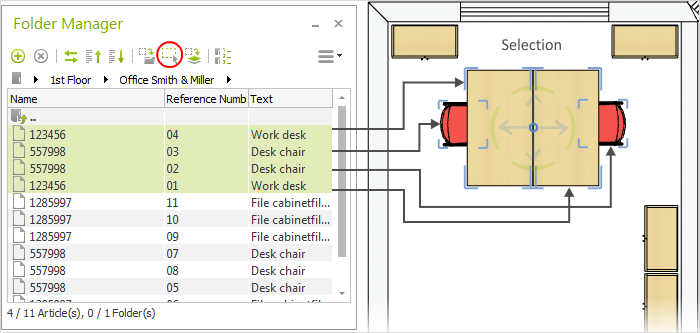
Selecting particular articles in the Article Explorer enables them to be selected in the drawing if the right button is then clicked (see next screenshot).
Alternatively you can double click a position to mark the respective article within the planning.
Adding Marked Articles to the Selection in the Drawing/Removing Articles from the Selection
The function described in the section above means that articles marked in the Article Explorer will appear in the drawing as having been selected. To extend this selection to include further articles, this is what to do:
1.Mark in the Article Explorer the article(s) to be added to the selection. 2.Right click to open the context menu and click on Add to Selection. This will extend the selection in the drawing. |
To remove articles from the selection, proceed as follows.
1.select the articles to be removed from the selection in the planning in the Article Explorer.
2.Right-click on the Article Explorer to open the context menu.
3.Click Remove from Selection. The selected articles are deselected in the planning.

Mark Selected Articles in Article Explorer
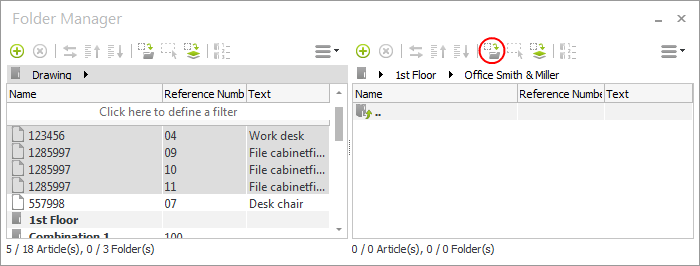
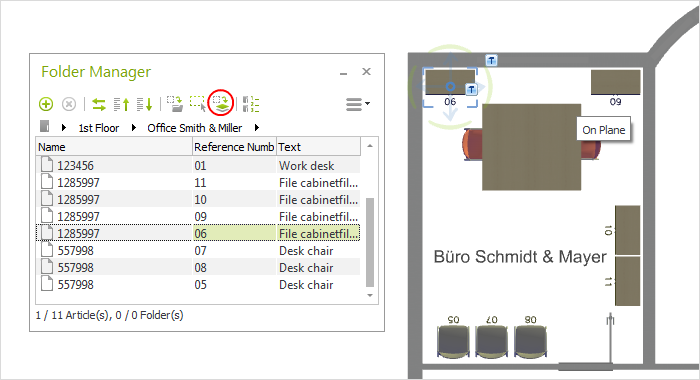
Individual articles are easily retrieved even if they are on complex paths within the Article Explorer. The Article has to be selected in the design and the Article Explorer has to be started from the symbol on the toolbar. After a click on the icon marked red in the image, the Article Explorer goes straight to the folder containing the article and highlights it.
Find and Show Inconsistent Articles
Inconsistent Articles are marked in red in the table. Hoovering the mouse over the respective Article will open a tooltip giving a description of the inconsistence.
Use the option Select Articles to select the inconsistent Articles in the drawing and configure them to fix the inconsistence.

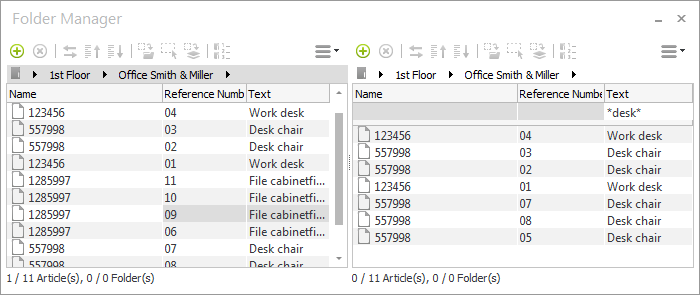
There is a filter row which can be shown using the context menu (right click, Show Filter Row entry) and which will enable you to filter for Name, Reference Number or Text (see next screenshot).
Setting a Filter For a Column
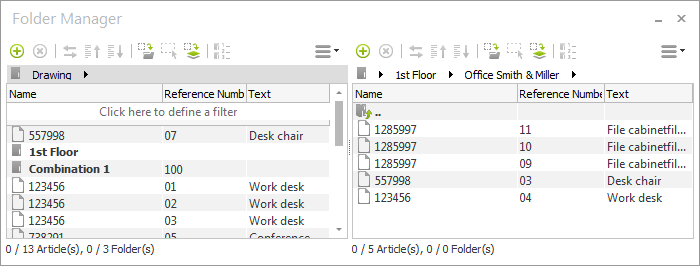
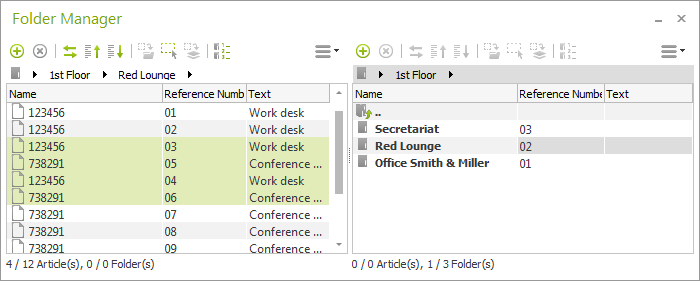
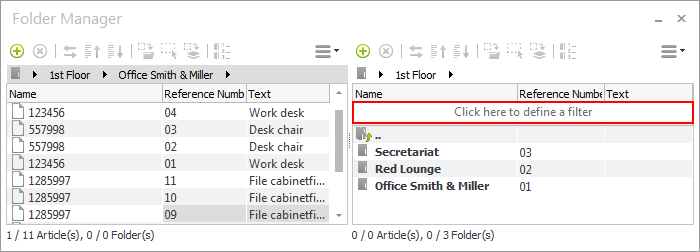
Having clicked on the filter row, click again to choose between the columns of the table. Now enter the string which is to be used for the filter. In the following screenshot, it can be seen that the filter in the Text column has been activated and that the string to be filtered out is “*desk”. The “*” in front of the word “desk” is a wild card, meaning that any articles will be listed which have other strings in the Text column in front of “desk”, for example “Work desk”.
Comparing the left and the right sides of the Article Explorer will help make clear how the filter works. The same folder is shown on both sides, but on the right the “*desk” filter has been applied. The system itself has automatically inserted the asterisk after “desk”.
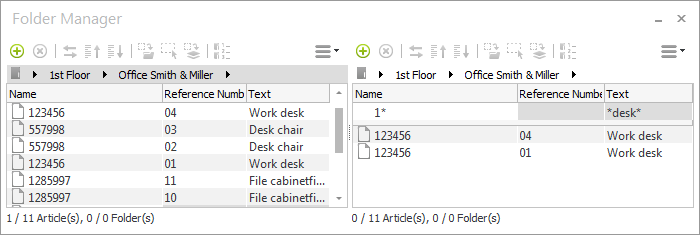
Setting a Filter for More Than One Column
It is possible to use filters for several columns at the same time. In the example used here, an additional filter could be set for the Name column in which the string “1*” is the filter. The following screenshot shows the outcome of the operation.
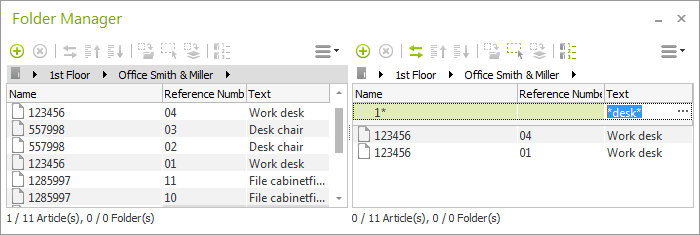
Editing, Deleting and Deactivating Filters
To edit or delete the filter entry for a column, double click on it. This will select it (see next screenshot) and it can now be either altered or deleted by pressing Backspace on the keyboard.
It is possible to deactivate the filter row, again using the context menu (right click) and the Show Filter Row entry. Even if the filter row has been deactivated, the entries you have made for the Name, Reference Number and Text columns will appear again next time the filter row is called up.
Userdefined Filter
Open the user-defined filter for a table column by clicking on the filter icon in the column. Click on (Custom...) to open a dialog with specification options for filtering by Article. Your filter entries from several columns are combined.

You can update your Articles directly via the Article Explorer. Select the articles and use the Update Articles button (![]() ).
).
As an alternative, select your Articles and open the context menu (by a click on the right mouse button). Then, select the Update Articles option.
