Rotate
Objects are rotated by means of the Rotation tool, the Object Interactor or the Transformation area in the Properties Editor.
|
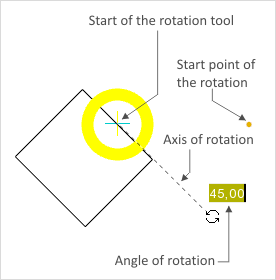
First select the object and then activate the rotation tool with the Rotate button in the Tools group, Edit tab. 1.Click onto whatever point you wish in the design or on the object. This point has been labeled “Start of the rotation tool” in the image. 2.Move the cursor and set the start of the rotation by clicking a second time. 3.Now rotate the object by the desired angle and fix it by clicking the left mouse button again. Alternatively, enter the figures for the angle with the keyboard and confirm with the Enter key. |
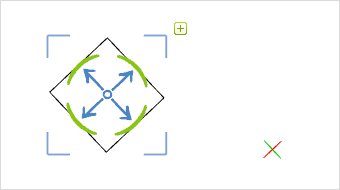
Interactor in Default Orientation
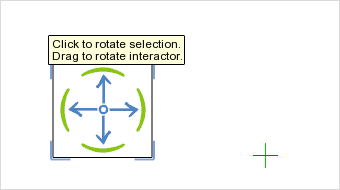
Ensure that the object interactor is active and then select the object to be rotated.
1.Click on one of the green arcs to start the process of rotation. Which arc is selected will decide where the rotation starts. 2.Now move the mouse to turn the object through a certain angle: this can also be entered as figures on the keyboard (see bottom-right image). 3.Another mouse click or pressing the Enter key completes the rotation and fixes the object in its new orientation. |
|
|
Multiselection: rotate objects around a common center or around individual object center points
If multiple objects are selected and the Object Interactor is used to rotate them, they are by default rotated around the common center of the selection.
It is also possible to rotate these objects around their individual object centers:
1.Select objects.
2.Start the rotation process by clicking one of the green arcs of the Object Interactor.
3.Use a right click to open the context menu.
4.Click Rotate individually to rotate the selected objects arround their individual object centers.
5.Now move the mouse to turn the objects through a certain angle. The angle can also be entered as figures on the keyboard. An additional click on the mouse or pressing Enter fix the objects in their new orientation.


Rotating the Object Interactor
The Object Interact can be rotated, for example to make it easier to work with objects in a rotated coordinate system.
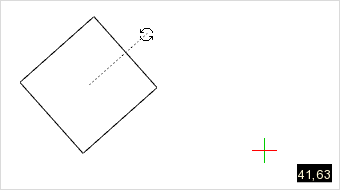
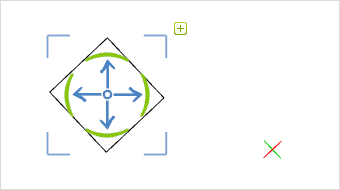
The lower left picture shows a rectangle which is within a rotated UCS. The object interactor is still in default orientation when the object is marked. You can adjust the Object Interactor to the rotated coordinate system in order to align the object with respect to the UCS: To do this, click on one of the green arcs and hold down the mouse button briefly. The interactor can now be rotated by moving the mouse and Axis Snap can be used to orient it exactly to the UCS orientation. Clicking again will fix the interactor in its new position (see image on right).
|
|
Transformation Area in the Properties Editor
A selected object can also be rotated via the Transformation area in the Properties Editor. The Rotation area allows scaling elements with respect to the three axes of the coordinate system.
1.Select the element (or multiple elements) that you want to rotate.
2.In the Properties Editor, click on the Common tab.
3.Enter the desired rotation angle in the Rotation area. Rotation can be altered with respect to X, Y and Z axis.
4.Confirm the new angles with ENTER. Alternatively, press the TAB key. In this way, the value is confirmed and your cursor jumps to the following input field at the same time.
The Rotation option is available for all 3d objects in your drawing.
Multiselection enables rotating multiple objects at once.