Working with guiding points and guiding lines
Guiding lines and guide points are tools which make it easier to position an align objects. They will be automatically available for all operations (such as drawing, translating/moving or rotating) and will take account of every rotation in the UCS (user coordinates system).
Move the cursor onto an edge of the object or onto a point such as a corner and hold it steady for a moment. A temporary guiding line or guiding point will be established forthwith and will appear for you to see.
As demonstrated in the following example, guiding lines can be set so that objects can be dragged along them.
|
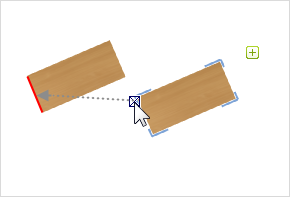
1.If the table on the right is to be moved along the edge of the table on the left, which is marked in red, it must first be brought into position. |
|
2.Move the cursor over the edge of the table on the left until the snap point is visible (see image) and hold the mouse steady for a moment or two. A guiding line will appear briefly. You can now move the table along this line.
|
Shared intersections can be used, for instance, to position the UCS and then to place both tables at an equal distance from the shared intersection.
|
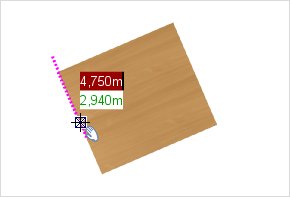
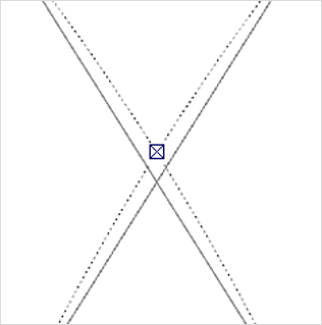
1.Move the cursor onto a point (here onto the corner of a table) and hold the cursor steady. Within a moment or two, a red and green dotted axis will appear and the point visualized will be saved as a guiding point. 2.Now place the cursor on the next point (in this case on the bottom left corner of the upper table). Here again, the green and red pair of dotted axes will become visible after a short time and a second guiding point will be stored. |
|
3.If the cursor is now moved in the direction of the shared intersection, it will be displayed. With this point, for example in the UCS, you can position both tables at an equal distance from the shared intersection. |
Guiding Lines for Circles and Arcs
Working with guiding lines and guiding points for circles and for segments of circles follows basically the same logic as is described above. Guiding lines make it possible not only for centers of circles to be highlighted but also for imaginary intersections of arcs to be visualized. There is the additional possibility of determining the precise mathematical intersection points of two circles with the aid of guiding lines.
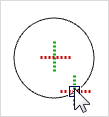
Setting the Center of a Circle
|
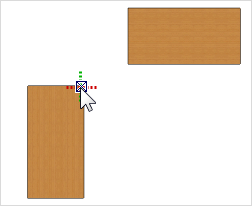
To find the center of a circle, set the cursor somewhere on the circumference and hold it steady for a short time. The center will appear as a guiding point and will be saved as such (see image on left). If the cursor is now moved in the direction of the center, the center point will be displayed You will now, for example, be able to move the circle using its center point. |
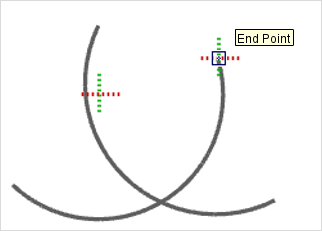
Notional Extensions to Arcs
If necessary, a complete circle can be computed to serve as a guiding line for an arc. An example of the use is that intersections of notional arc extensions can be displayed so that objects can be positioned exactly. This is how:
|
|
|
||
1. |
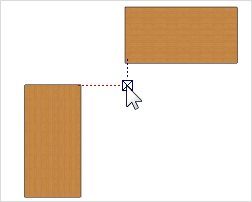
Position the cursor anywhere on the arc. After an instant, the guiding line will be enabled. That is signalled by flashing of the cursor cross symbol. |
|
2. |
Then the guiding line will be displayed as a continuation of the arc. Do the same for the second arc and you will be able to see their notional intersections. |
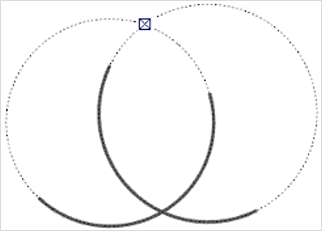
Exact Circle Intersections
Circular geometrical shapes are made up of small individual line segments. The number of these can be influenced by means of the Level of Detail option under general Settings. In consequence, the geometrical shapes are actually only an exact circle or arc by approximation, which means that there may be deviation in the position of the intersection or snap points that can cause errors in the design.
The new guiding lines for circles and arcs will compute intersections which are mathematically accurate. These can be used as an alternative to the 'geometrical' intersections. The guiding lines are activated in a similar way to that in the last example: they appear when the cursor is on the circle or arc and held there for an instant. As soon as the guiding line is active, the intersections taken account of for snapping will be the computed intersections rather than the geometrical ones.
|
|
|
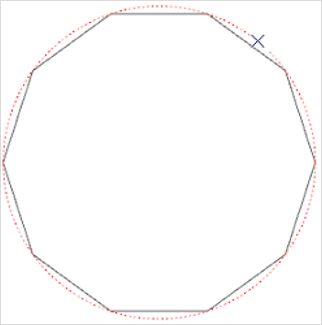
The screenshot on the left shows how the segments of circles and the guiding line deviate from each other when the resolution is very low. The illustration on the right shows how the actual intersections of two circles can be marked by means of mathematically exact guiding lines.