Align Objects Using a Reference Point
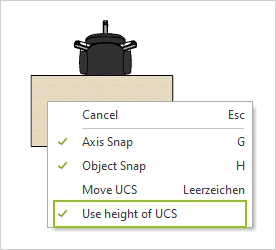
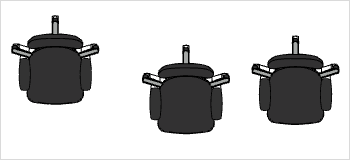
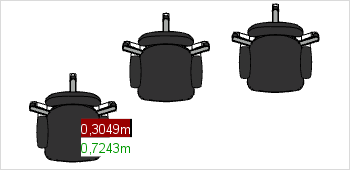
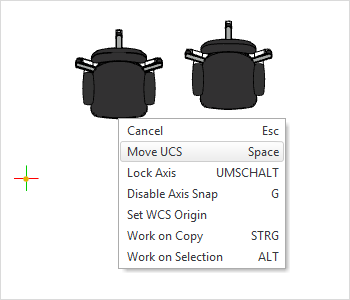
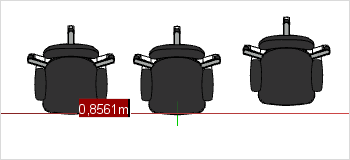
The reference point always marks the origin of the coordinate system. The direction of its axis represents its rotation. The sections below show and explain how to align objects with the help of the reference point. In one case the coordinate system without rotation is used and in the other there is rotation. Alignment With no Rotation of Coordinate System In this example, you will align the front edge of three chairs to the same height. 1.Select the first object that you would like to move. 2.Move the mouse, which is now attached to the first chair, over the front edge of the next chair. 3.Right click. 4.Select Move UCS from the Context menu. The UCS will now move to the edge of the second chair. 5.You can now move the first chair along the axis. 6.Repeat the process for additional objects. With the C key, you can switch between various UCS positions. C shifts the origin between the WCS, the user’s last-selected position and, if a tool in pCon.planner is active, pCon.planner’s suggested position. If you do not want to use the height of the other objects in the planning in the Top view, open the context menu during insertion and deselect Use height of UCS. |
|
|
|
|
|
|
|
|

Alignment With Rotation of Coordinate System
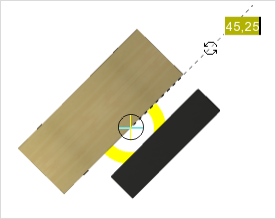
The two objects in the picture (a table and a bench) are parallel to each other in the non-rotated coordinate system. The task is now to turn the ensemble anti-clockwise through 45° and then center the bench in relation to the table. In the screenshots below the reference point is shown circled in black. |
|
Mark both the objects and rotate the group 45°, anti-clockwise. The quickest way to do this is simply to enter the angle once the Rotate tool has been started. The coordinate axes are still in their usual orientation, as you can see from the reference point marked. |
|
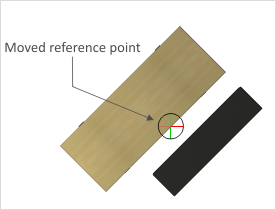
To align the bench, place the reference point on the lower edge of the table by moving the mouse there and pressing the Space key. Alternatively, select the Move UCS item from the context menu. |
|
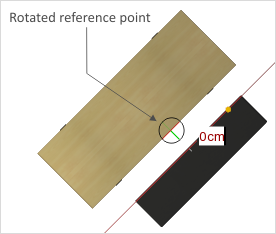
Now, to align the bench, you have to rotate the UCS. To do so, leave the cursor on the center of the lower edge of the table and press V or select Rotate UCS in the context menu. You can center the bench by putting the cursor on the center of one of the outside edges, starting the Move tool and then entering the value 0 cm. |
|
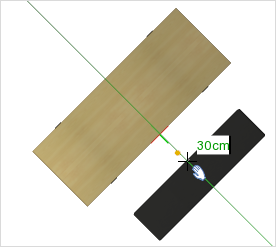
Now “hold” the center of the upper outer edge of the bench and move it towards the table following the angle of 45°. The green axis will appear, making your task easier. Now set a distance of about 30 cm between the edge of the table and the upper edge of the bench. This step concludes the alignment procedure using the rotated UCS. |
|

Rotating an Object
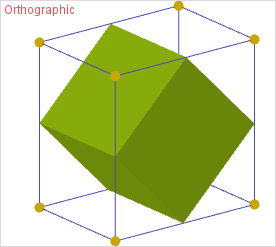
A rotated cube is to be seen on the right. The task is now to scale the cube. As can be clearly seen, the scaling interactors are not at the corners of the cube. The UCS is currently aligned with the WCS. Scaling at this stage would result in distortion of the body. The cube can only be scaled if the UCS is aligned with the cube coordinates system. |
|
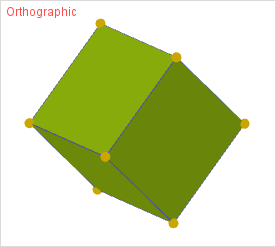
Move the mouse cursor onto the cube and press J on the keyboard. Alternatively, go into the context menu and click on the Rotating an object entry. Now the scaling interactors have aligned themselves with the cube corners. You can now scale the object without any distortion. |
|
The default alignment can be obtained from the Set WCS Direction item in the context menu.
In two-dimensional views (such as Top or Front view), the UCS is by default moved to the height of the objects you are moving: If you move an object in the Top view, it remains at its initial height. This only changes if you catch an snap point at a different height while moving the object. In this case, the object will jump to the height of the snap point.
You can change this behavior using the context menu. 1.Start the move process. 2.Open the context menu. 3.Click Use height of UCS to uncheck this option. 4.The object is now at the height of the WCS and can be moved there. |
|