Materials Dialog
Note: On our Youtube channel you will find a video on this topic |
||
|
|
In this video, we’ll guide you step by step through how to identify materials in your project, explore additional manufacturer information provided via the pCon.catalog portal, and export all relevant data on surfaces, quantities, and manufacturers using the Material Report in pCon.planner Pro. |
|
|
pCon.planner provides you with the flexibility you need, allowing you to quickly and precisely adjust materials. In this video, we’ll show you how it works! |
In pCon.planner, materials give object surfaces the appearance of a particular raw material (e.g. glass, metal or wood). To simulate materials, pCon.planner uses the physical material model. This simulates what a material looks like when light meets its surface.
A physically correct material has different ways of interacting with light: Light is reflected, refracted or absorbed. A material becomes visible to us because it reflects incident light. Furthermore, we are able to see materials that shed light by themselves. To read background information on the physical material model, please follow this link.
pCon.planner displays complete materials in Realistic mode as well as render styles based on Realistic mode. Photo-realistic rendering also processes these materials. Other render styles do not display materials or only display simplified versions of them (e.g. in Shaded mode, color textures are displayed, but not Normal Maps).
The Materials dialog is the tool for displaying, creating, modifying and managing materials. It is opened from the Materials dialog button in the Material group on the Edit tab or from the toolbar.
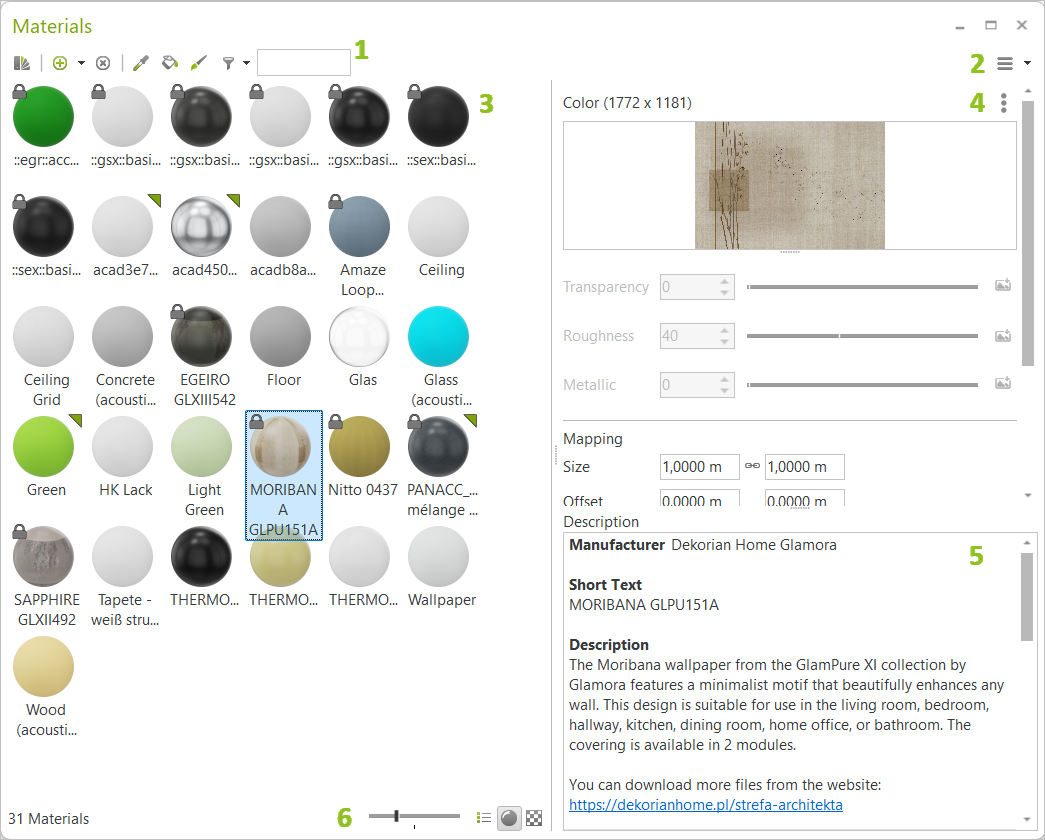
1 |
|
2 |
|
3 |
Material Browser (with additional options in the context menu) |
4 |
|
5 |
|
6 |
![]()
The toolbar is located top left in the Materials dialog. It contains a number of functions:
|
Open materials in the pCon.catalog. The selected material can be assigned directly to an area in the drawing by clicking on it. |
|
Create Standard Material: The small arrow to the right of the plus symbol will open a selection of material templates (see below). |
|
Create a new material from a template. |
|
Delete an existing material: A deleted material can be restored using the Undo command (Quick Access toolbar). |
|
If the pipette is clicked onto an object in the design, its material will be selected in the Materials dialog. The pipette is also used to sample the color from objects in the design. Sampling means that it will be automatically converted into a material in the Materials dialog. |
|
The material selected in the Materials dialog can be assigned to a surface within the plan by clicking on it. In addition, you will also find the function Replace Material: Click on the paint bucket and then open the context menu (right-click). This option will replace the material on the selected surface within the entire selection as well as all surfaces of the object that use the selected material. |
|
Assigning a material to a selected object: The objects will be completed coated with the material. |
|
Calling up the filter menu. Here you can search for materials based on specific criteria. •Show all materials •Show assigned materials •Show unassigned materials •Show materials from selected objects within the plan •Hidden materials (OFML article materials) •Attachment materials •Types: filter by material type (All or Standard, Glas, Luminous, Photometric) |
Filter row |
Search for materials by name. |
The following functions are available in the hamburger menu: |
|
|
Show/hide material editor (parameters for material selected in the material browser) |
|
Show material description area |
|
Deleting all materials not assigned to objects. If unassigned materials should be retained, do not use the local function in the Materials dialog. Instead, use the global Purge function in the Application Menu. |
|
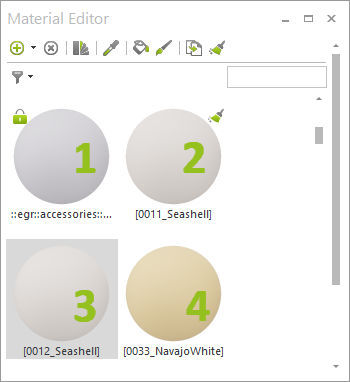
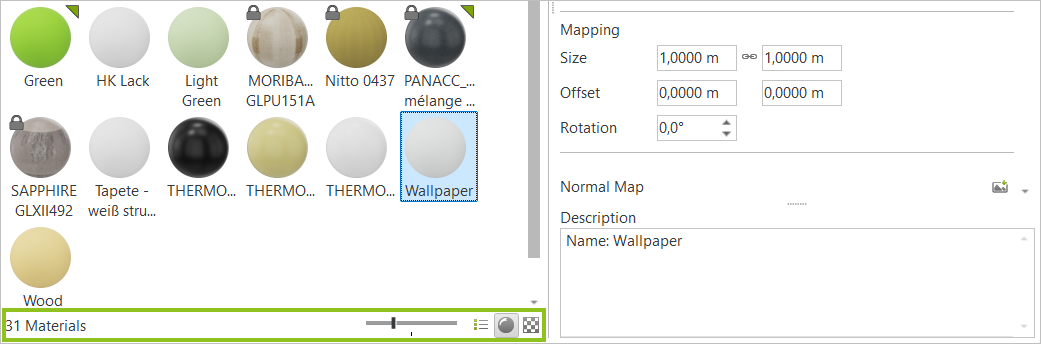
Right beneath the toolbar is the Material Browser. It shows materials used in the current design. The image on the left shows four materials: 1.Material is locked and cannot be edited. Click the lock icon on the material to unlock it. 2.Material is currently not selected. 3.Material is currently selected for editing. 4.Material is not assigned to an object in the plan. Click the triangle icon to delete all unassigned materials in the planning. |
Note: Materials from Articles and Models are inserted as read only. They are marked as Hidden Materials and can be filtered via the Toolbar. Materials in Attachments are also locked for editing. They to can be hidden/displayed in the Material Browser via the filter functions on the Toolbar. To edit a locked material, use the Derive Copy feature from the context menu. |
|---|
|
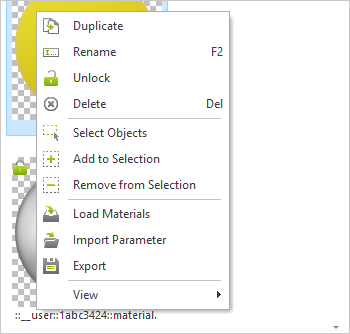
A right click on a material in the Material Browser will open a context menu. |
||
|
Deriving a copy from an existing material. For example, this function is useful for making a copy of write-protected materials so that they can be modified. |
||
|
Select the objects in the design which use the material currently selected in the Material Browser. |
||
|
Extend the selection in the design to include those objects which are using the selected material. |
||
|
Remove objects with a chosen material from the selection. |
||
|
Load a material from a file. |
||
|
Import material parameters and replace the parameters of the active material with them. 1.Select material. 2.Open context menu: click on Import Parameter. 3.Select a MATZ file in the file import window. This overwrites the parameters of the active material (e.g. texture, roughness, normal map). Alternatively, import an image file into the active material here. |
||
|
|||
View |
Display options: rendered preview, checkerboard background, large material symbols, refresh material list |
||
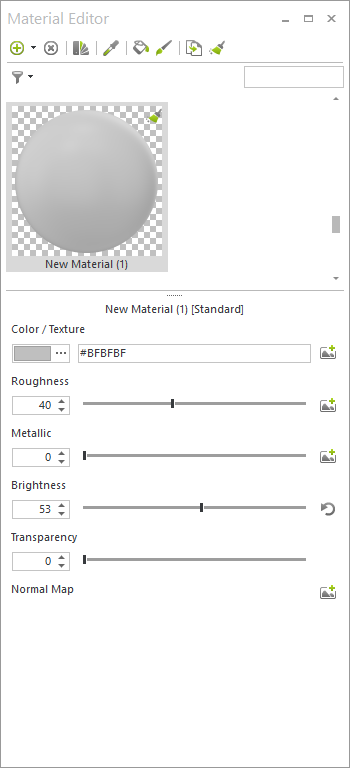
The material editor on the right side of the Materials dialog shows all parameters for the material currently selected in the material browser.
This is where you make your settings while creating or editing a material.
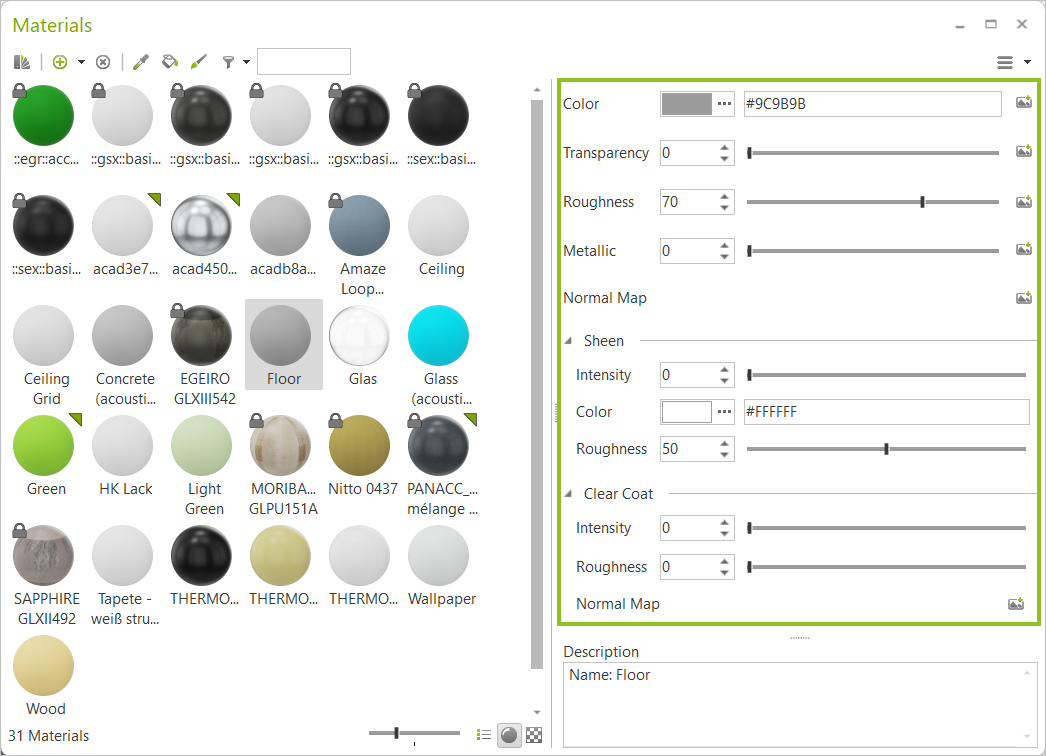
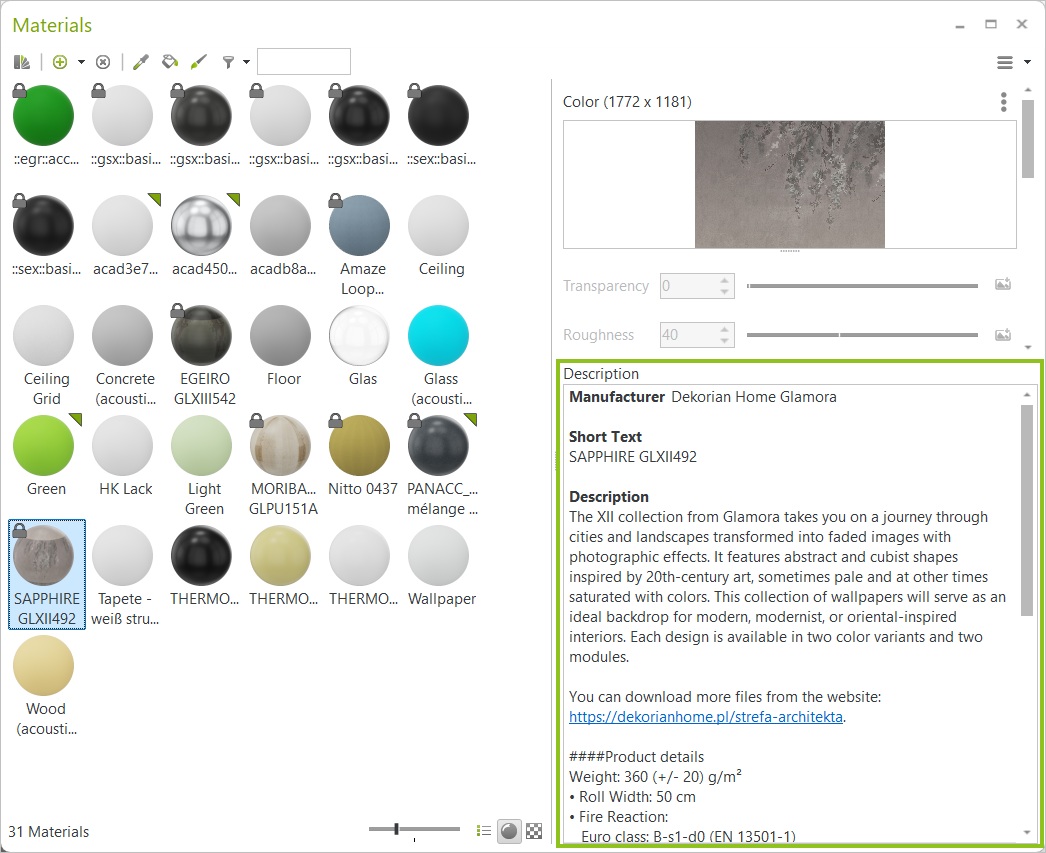
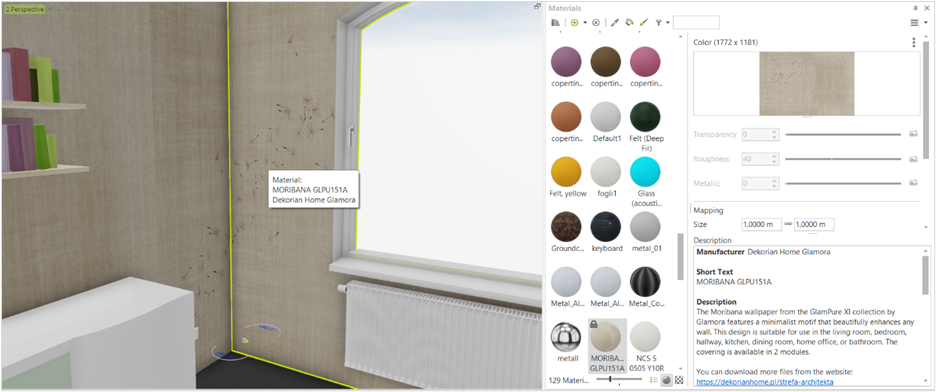
Depending on the information contained in the material file, the description area in the lower right part of the Materials dialog provides additional information on the material selected in the material browser. The description area includes a link to the material in pCon.catalog as well as manufacturer information. If no enhanced information is contained in the material, only its name is shown here.
The displayed material information cannot be edited. The information is based on the selected data language.
In the drawing, information on a specific material is displayed when hovering over a surface with this material.
Below the material browser, the status bar gives information on the number of materials used in the drawing. It also provides settings for the display of the materials in the browser:
•Slider: used to define size of material preview image
•Live preview: click to activate or deactivate live material preview
•Checkerboard: render live preview with checkerboard background
pCon.planner’s physical rendering differentiates between the various material types. The interaction from light and material is controlled through the material properties. The selected material type influences the behavior of the light when interacting with the material.
•The specular portion of the light is reflected directly at the surface.
•Diffuse reflection is caused by the scattering of rays of light within the material: rays of light enter into the material and are deflected into different directions.
•Metal materials only have specular reflection, non-metals reflect predominantly diffuse.
•Depending on the properties of a material, the light rays enter deeper into the material. They are either passed through the material (transparency), thrown back within the material (translucency) or swallowed by the material (absorption).
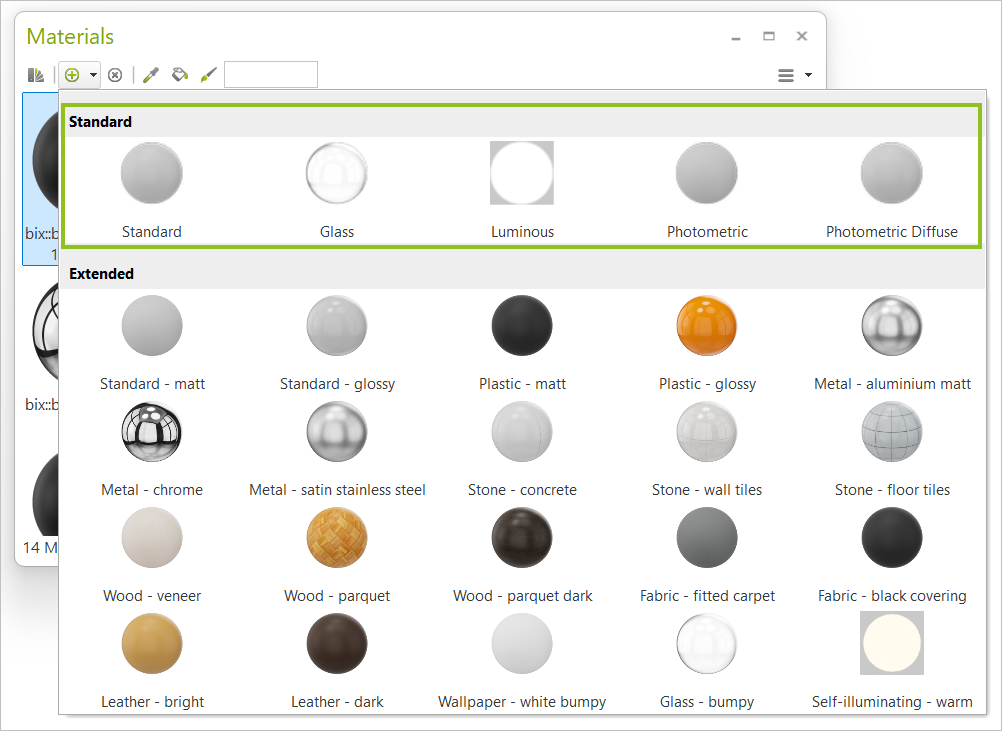
The following material types, which set the various interaction possibilities for light and materials, can be found in pCon.planner. For each material type, you will find various setting possibilities. When you create a new material in the Materials dialog, you will immediately choose the type. To do so, click on the small, black arrow next to the plus symbol:
•Standard – Metal or Non-Metal
•Glass
•Luminous
In addition, there are two other types of material: photometric diffuse and photometric. These are relevant for the planning of lighting scenarios.
Parameters for Standard Materials
Color/Texture
A color or texture is the base of every material.
•Materials that are based on a color use a HEX or RGB value to simulate the character of a certain material.
•The color of a metal material defines intensity and color of its specular reflection.
•Textured materials use an image (texture) to create the semblance of a surface structure. The texture defines structure and color of a material.
•Color/Texture controls the brightness of the material. The brightness of a color value can be changed as required via the color selection dialog. For texture-based materials, the brightness is adjusted in the Edit Texture dialog.
Transparency
•Transparency determines what portion of rays of light passes through the material.
•For a standard material, values of 0% (not transparent) to 100% (completely transparent) are possible.
•Materials with a base texture as well as those with a base color can be assigned a transparency value.
Roughness
The degree of roughness defines how smooth or rough a surface looks. Depending on the roughness, the specular reflected light will be scattered more or less strongly.
•0% Roughness: Smooth and polished surface – sharp specular reflection.
•100% Roughness: Very rough and matt surface – blurry specular reflection.
•If you want to create a material with different roughness areas, use a monochrome version of the texture. Light areas of the image will be matt, dark areas will be displayed as glossy.
Standard Material: Metallic
•In the physical world, materials are either metallic or non-metallic. Therefore, the Metallic control should either be set to 0% or to 100%.
•Intermediate values are used to simulate polluted metal or metalloids.
•The metallic value can also be controlled via a map: Light image areas are marked as metal, dark areas are interpreted as non-metal.
•You can add a Normal Map to a material. The normal map simulates the illumination of bumps and dents within a material. This paragraph introduces you into the creation of maps.
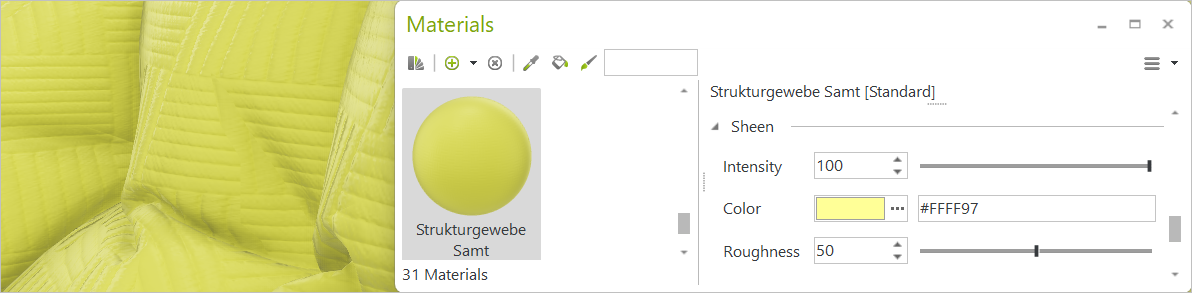
Sheen
•Gloss parameter that supports the creation of fabrics such as satin or velvet.
•Intensity, color and roughness can be adjusted separately.
|
|
In this video, we’ll guide you step by step through creating your own velvet materials, adjusting the key parameters, and seeing how the effect looks in practice – both in real-time view and in renderings. You’ll also learn how to apply the velvet effect not only to plain fabrics but also to patterned textures. |
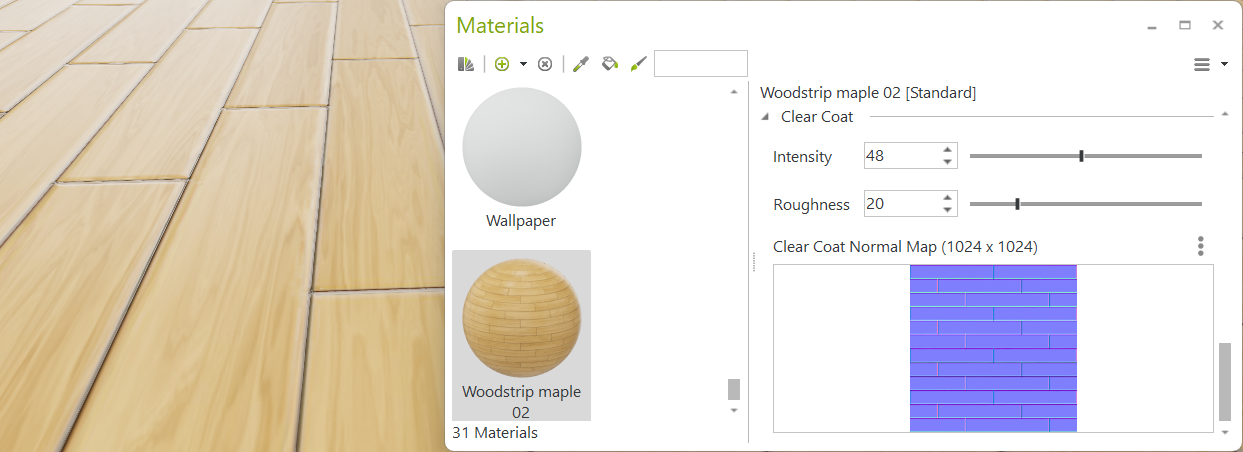
•Adds a layer of varnish to the material.
•Intensity and roughness can be adjusted separately.
•A separate Normal Map can be used for the clear coat effect to simulate the structure of the paint.
Note: Please note that the Normal Map in the Clear Coat area only affects the structure of the coating. To simulate structure in the material itself, please create a separate Normal Map in the upper area of the material parameters. |
|---|
Parameters for Glass Materials
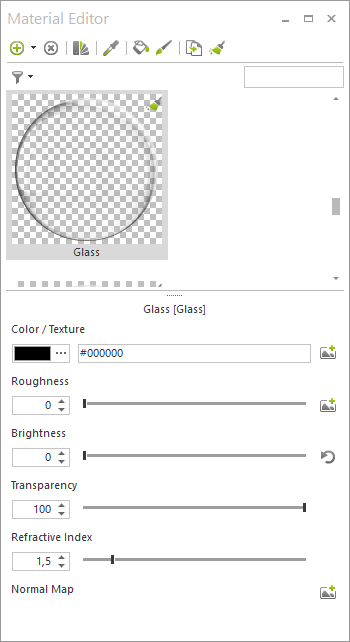
Color/Texture
A color or texture is the base of every material.
•Materials that are based on a color use a HEX or RGB value to simulate the character of a certain material.
•The color of a metal material defines intensity and color of its specular reflection.
•Textured materials use an image (texture) to create the semblance of a surface structure. The texture defines structure and color of a material.
•Color/Texture controls the brightness of the material. The brightness of a color value can be changed as required via the color selection dialog. For texture-based materials, the brightness is adjusted in the Edit Texture dialog.
Transparency
•Transparency determines what portion of rays of light passes through the material.
•For a standard glass material, 100% transparency are set as standard value.
•Materials with a base texture as well as those with a base color can be assigned a transparency value.
Roughness
The degree of roughness defines how smooth or rough a surface looks. Depending on the roughness, the specular reflected light will be scattered more or less strongly.
•0% Roughness: Smooth and polished surface – sharp specular reflection.
•100% Roughness: Very rough and matt surface – blurry specular reflection.
•If you want to create a material with different roughness areas, use a monochrome version of the texture. Light areas of the image will be matt, dark areas will be displayed as glossy.
Refractive Index
•Indicates how strong light rays are refracted when hitting a material.
•Values range from 1 (no refraction of the incident rays of light, like in a vacuum) to 5 (very strong refraction).
•Most materials are approximating a value of 1.5.
•The refraction index defines the intensity of the specular reflection of glass materials.
Parameters for Luminous Materials
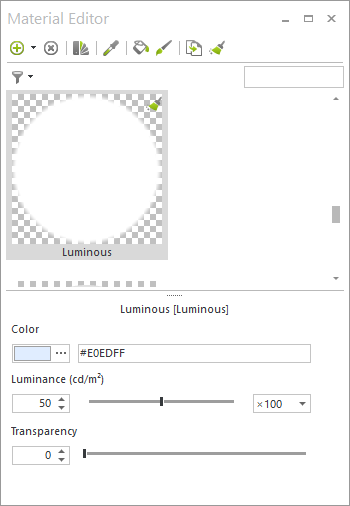
Luminous materials are based on a color as well as a luminance. A transparency value can be assigned in addition.
The shader automatically adds a blooming effect to lumi-nous materials. Blooming creates a soft glow in the direct environment of a luminous object.
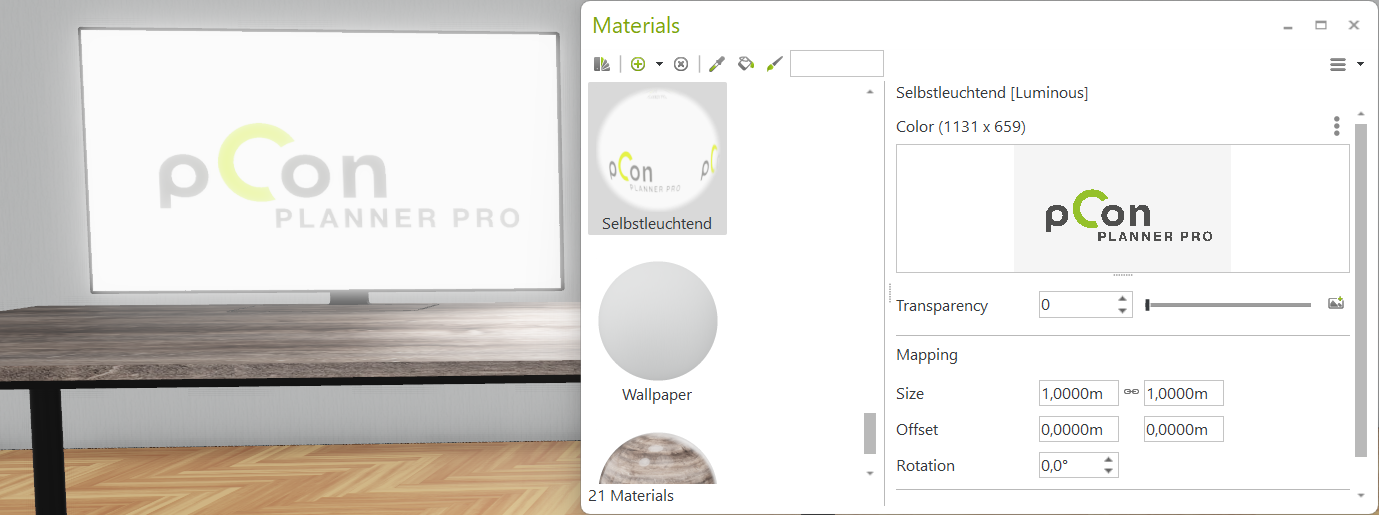
You can add a texture to self-luminous materials to create displays, for example.
|
|
In this video, we’ll show you step by step how to create a self-illuminating material, adjust the luminance parameters, and use multipliers to control brightness. You’ll also see practical examples - from a monitor in an office scene to a TV in a meeting room - and learn how the effect looks both in real-time and in rendered views. |
Depending on the basic material type, different color textures or maps can be integrated into your material:
Texture/Map |
What it does |
Standard |
Glass |
Luminous |
Color Texture |
Textured materials use an image (texture) to give a material the appearance of structure. The texture defines color as well as structure of the material. |
x |
x |
x |
Transparency Map |
Defines the transparent/non-transparent areas of a texture. Black areas create transparency. |
x |
x |
x |
Roughness Map |
Controls roughness areas using a black and white version of the texture. Light areas of the image appear rough, dark areas shiny. |
x |
x |
|
Metallic Map |
Controls the metallicity of different image areas. Light image areas are given metallic properties, dark areas are interpreted as non-metallic. |
x |
|
|
Normal Map |
Simulates the illumination of structures in the material. |
x |
x |
|
Normal Map: Clear Coat |
Simulates the structure of a varnish. Light areas of the map are displayed with the clear coat effect. This is omitted for dark areas. |
x |
|
|
Create and Edit Textures and Maps
We recommend the use of ready-made materials. You can find a large selection in pCon.catalog. However, if you would like to create your own materials and enrich them with textures or maps, you will find a sample guide in this section.
Use an external image editing program to derive a map from a texture.
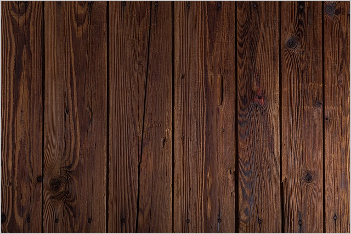
Daria Yakovleva/pixabay.com |
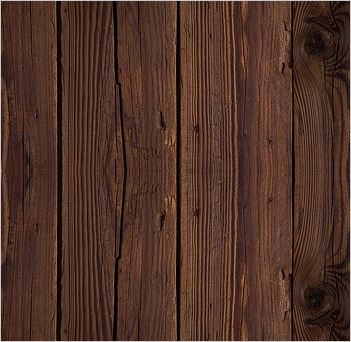
Create Color Texture Pictured on the left is an image that has still to be reworked to function as a texture. If the texture is put together in tiles, the transitions should be invisible. In our example, we created seamless transitions by mirroring and copying parts of the image in an external image editing program. We recommend using high-definition scans of your materials or looking up premade textures on the internet. Please keep in mind that the texture should be seamless. In this case you can go without image editing. Click the |
|
|
|
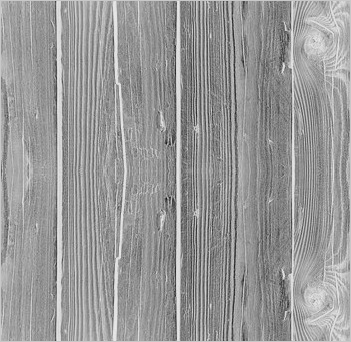
Create Roughness Map Save the texture under a new name to create an image containing roughness information. This Roughness Map uses greyscale. In our example, the map was created by inverting the texture and by resetting the saturation. •Light areas of the map are read as rough, dark areas will be displayed as smooth. •The darker an area, the glossier it gets. Click the |
|
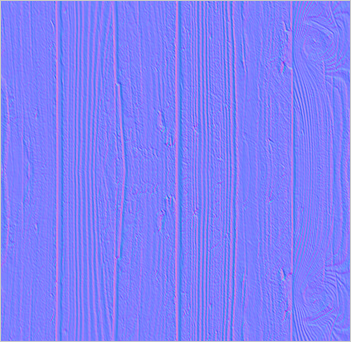
Create Normal Map For the Normal Map, the areas of the texture are colored in an external program with RGB values to create a relief. The relief of a normal map itself does not cast shadows, but makes individual pixels appear oriented differently. Click the To create a separate Normal Map in the Clear Coat section, follow the same steps. |
Create Metallic Map
For metal materials, the metal property can be controlled via a map: bright image areas get metal properties, dark ones are interpreted as non-metal.
The Metallic Map is used, for example, on metal surfaces with rusty areas.
Click the ![]() icon in the Materials dialog (Metallic area). Select a texture from your local file system.
icon in the Materials dialog (Metallic area). Select a texture from your local file system.
Note: A texture or map can be inserted into another channel within a material using drag & drop. For example, the Normal Map can be copied as a Normal Map for the Clear Coat area. |
|---|
Editing, Placing and Rotating Texture and Normal Map
In the Mapping area, you can set the rotation, width and height (aspect ratio can be locked and unlocked) or define an offset for the maps and textures within the selected material.
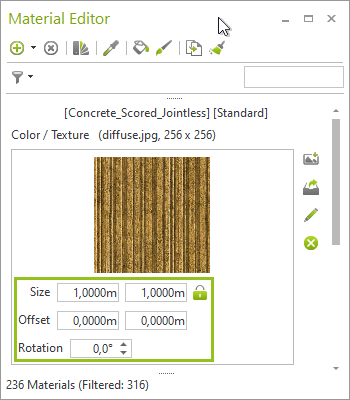
The mapping can be changed all at once for all maps/textures within the selected material.
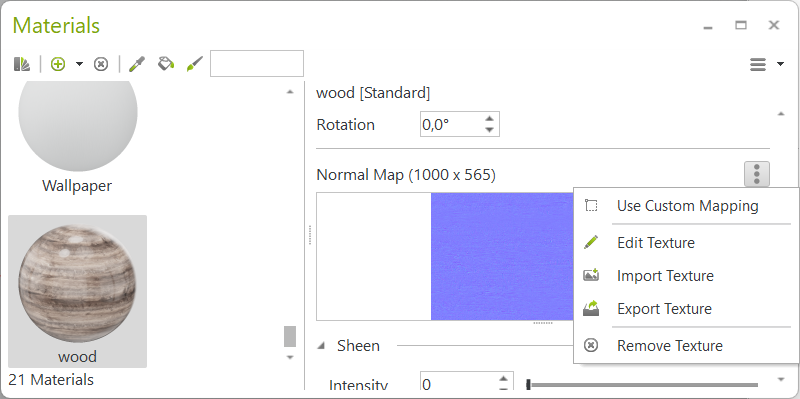
Exception: For the Normal Map and the separate Normal Map in the Clear Coat area, you can change the mapping independently of the general mapping if required. To do this, open the Kebab menu in the Normal Map area and click Use Custom Mapping.
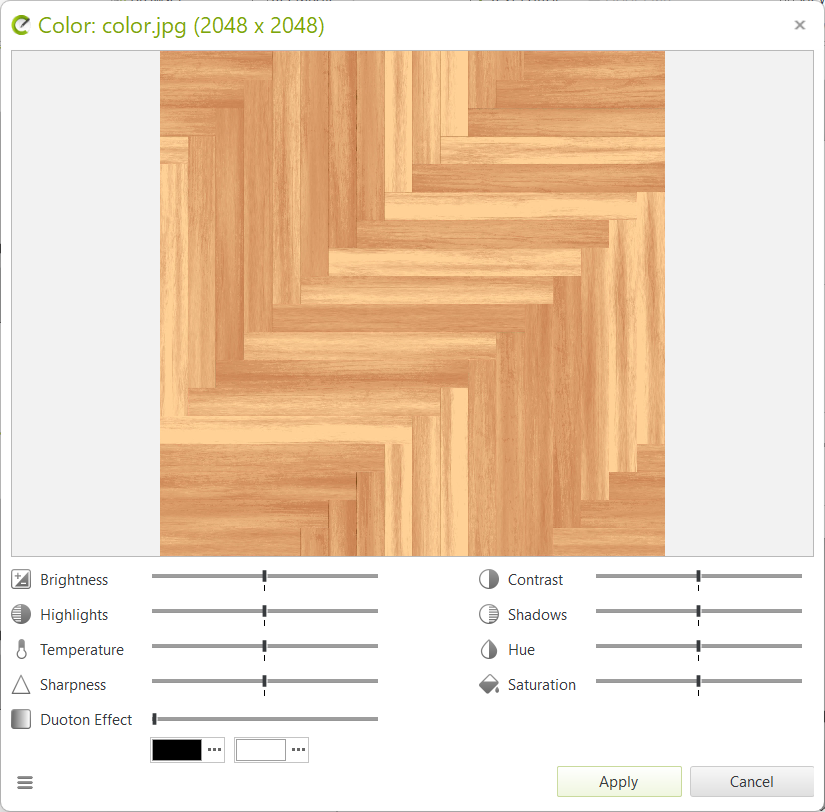
You can set parameters such as saturation, hue, contrast, etc. for the color texture: In the Color, double-click directly on the texture. This opens the Image Editor.
Important: In the Materials dialog, changes to a color texture cannot be undone using the Image Editor. You should therefore save your color texture externally before image processing.
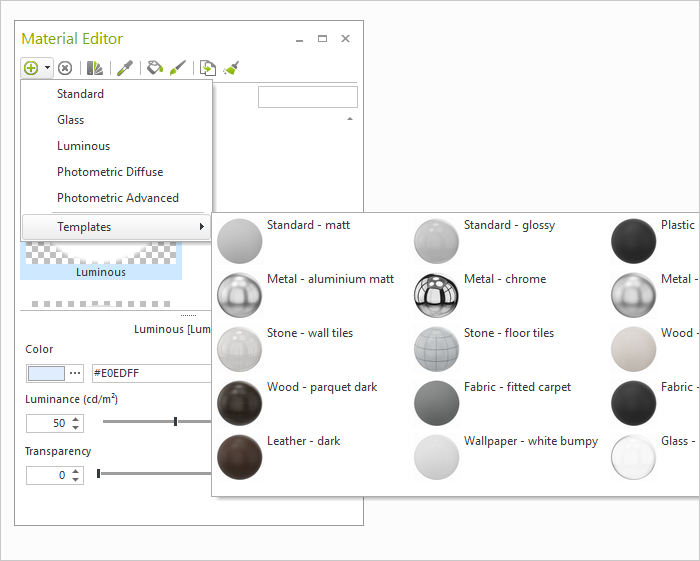
We recommend selecting one of the templates from the Materials dialog: Click on the small arrow next to the plus symbol. In the drop-down menu, hold the mouse over the templates. An additional menu will open with various material templates.
Please note the difference between material type (glass, standard and self-luminous) and template: A template is always based on the type of material: frosted glass is based on glass, wood, fabric or plastic is created using the standard material...
A huge variety of materials which you can use for your designs is provided in pCon.catalog.
Click the pCon.catalog icon (![]() ) in the Materials dialog.
) in the Materials dialog.
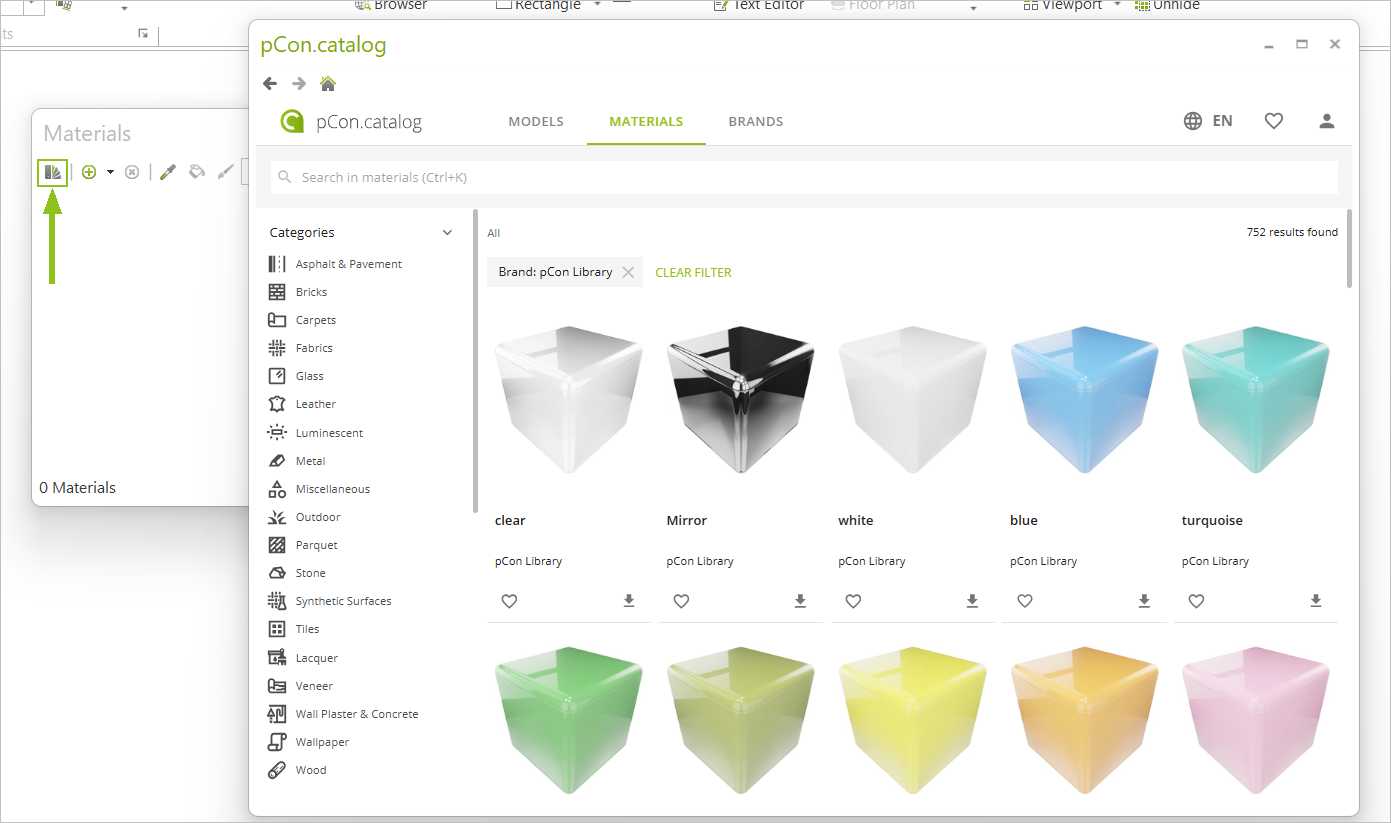
Note: Material templates from the Materials dialog will be loaded in the Materials dialog for further editing. Additionally, materials from the pCon.catalog can be assigned to an object directly after they are selected.
There are several ways of assigning materials to objects.
Assigning a Selected Material
1.Select the material from those in the Materials dialog. 2.Then click on the paint bucket icon ( 3.Every time you click on an object in the design the material previously selected will be assigned to the object (end assignment process by pressing Esc or using Cancel in the context menu). |
Replace Material
1.Select the material from those in the Materials dialog. 2.Then click on the paint bucket icon ( 3.Open the Context Menu by right clicking. Select Replace Material. 4.Click on the surface where you would like to replace the material. This option will replace the material from the clicked surface within the entire selection as well as all object surfaces where the clicked material is used. |
Assigning a Material to a Previously Selected Object
1.Mark the objects in the design to which you wish to assign a particular material. 2.Now click on the material you wish to assign (from the Material Browser). 3.On the toolbar, click the paintbrush icon ( |
Assigning a Material by Transfer
1.Click on the Material Transfer item in the Material group, Edit tab. 2.Now select the material in the design which you wish to assign to a further object by clicking on it. 3.The appearance of the cursor in the working area will change, in that the paint bucket becomes visible. Every time you click on an object in the design the material had previously selected will be assigned to the object. End the assignment process by pressing Esc or using Cancel in the context menu. |
Assigning a Material by Drag&Drop
Materials can be assigned using Drag&Drop, either directly from the Materials dialog, from the Media Browser or from the local system. The procedure is the same in each case. Below, there is an explanation of how to assign a material from the Material Browser.
1.In the Material Browser, click on the material you wish to assign to an object. Hold the mouse button down. 2.Drag the mouse (still holding the button down) onto the object to which the material is to be assigned. 3.Now release the mouse button. |
Note: Usually, the material is placed on the entire object by using Drag&Drop.
For walls as well as objects that are composed of several geometries, the status of selection is important: if your complex object or wall is selected, the material will be assigned to its complete surface. If the wall or complex object is not selected, the material will only be assigned to the area that you drag it directly to.
If required, replace or merge materials in the material browser using drag & drop:
Drag&drop of one material onto another material |
|
The parameters of the target material are replaced by the parameters of the source material. |
Drag&drop+ALT of one material onto another material |
|
The target material is replaced with the source material for all objects in your drawing. The target material remains in the material browser for later use. |
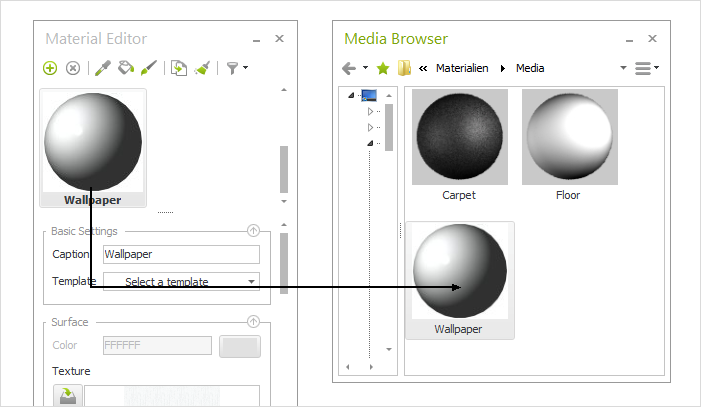
To save materials, you can either use the Export item in the context menu (see here) ore drag the material from the Material Browser and drop it into the Media Browser or into any directory of your system. Drag&Drop from Material Browser to Media Browser is illustrated in the next screenshot. It is possible to select several materials at a time (press Ctrl while selecting).