Editing Walls
It is possible to edit the Properties of walls like those of any other objects. The options given in the Basics section for Moving, Scaling and Rotating, etc., can be used in exactly the same way here. However, walls offer even more editing options and these are described in this section.
|
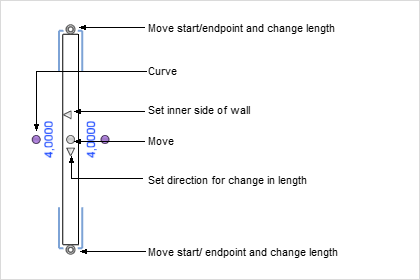
When a wall is selected, various interactors become visible, as demonstrated in the left-hand screenshot. They enable you to modify the position, the length, the curvature and the direction of a change in length. Because walls and room elements have their own interactors, the Object interactor will not be shown when these are selected individually. |
If a wall is edited by means of its interactors, Wall Elements as well as Wall Objects stay attached to it.
One way of moving walls is to use the Move option and another is to use the wall interactors. The differences between the normal Move tool and the use of the interactors are described in this section.
End Interactors
|
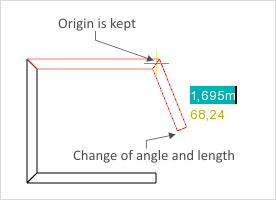
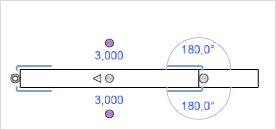
Each wall has two end interactors, one at each end. Clicking on one of them permits length and angle to be changed either by moving the mouse or entering the figures on the keyboard without altering the position of the other end. This is illustrated on the left. In this case it was the lower interactor which was used to modify length and angle. The origin of the wall will stay the same apart from this. |
Central Interactor
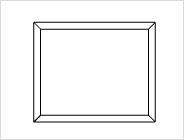
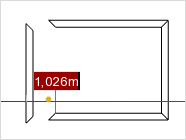
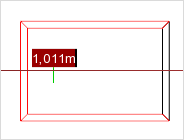
If a wall is moved using the central interactor, all contiguous walls and possibly the entire room will be modified. The normal move tool would separate the walls but this type of move maintains their connection to each other. It will be clear from the following three screenshots how this works. The left-hand shot shows a room of which the left outer wall is to be moved by 1 m. The middle image shows what happens when the wall is moved without using an interactor (i.e. by a normal move); and the right-hand image shows the result when the central interactor is used.
|
|
|
Interactor to Set Direction for Change in Length
This interactor enables you to define the direction in which a wall is lengthened. By clicking the interactor you reverse the direction.
By clicking on the triangle in the middle of the wall, you can now determine where the inner side of the wall should be.
The selected wall side will hold its position, even when you change the thickness of the wall, and the inner dimensions of the room will remain the same.
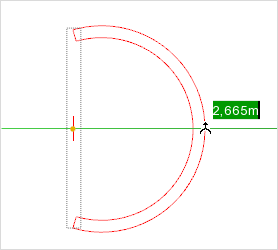
The curve interactors at the center of a wall enable you to shape it into a curve.
|
1.First select the wall to be bent. 2.Now click on one of the curve interactors to start creating the curvature. 3.Set this by moving the mouse. The screenshot on the left gives a demonstration. The wall shown with dotted lines is as it was before bending and the wall with its curvature is shown in red during the bending process. 4.The curvature is set either by mouse click or keyboard input. The number highlighted in green in the left-hand shot is the figure for the curvature. |
|
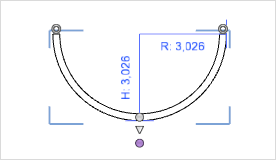
It is possible to adjust the curvature of a wall after it has been set. First select the wall, then enter values for the Height and Radius of the curvature (see left-hand image). It is also possible to modify wall curvature using the two end interactors. |
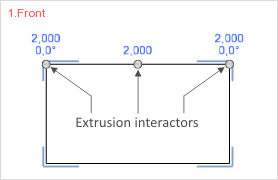
The terms extrusion and extrude are used to denote alteration of the Height of a wall. At first, all walls will be uniform in height. The Extrude function enables you to assign different heights and different slopes to your walls. The four Projections Left, Right, Front and Rear are the ones to use, as only in these are the extrusion interactors visible.
|
There are three Extrusion interactors for each wall (see diagram on left). The two outer ones permit both height and angle to be changed, which is how to make a wall slope. The central interactor will raise or lower the overall height of the wall. Clicking on the relevant interactor will activate the extrusion tool. Having done this, you can adapt the height by either moving the mouse or typing in figures. It is also possible to type minus values. |
|
Connect can be used to join up individual walls. Similarly, Disconnect will separate joined walls into individual ones. Got to the Start tab. Within the Room Elements group, there is the wall tools button (marked in red in the screenshot). |
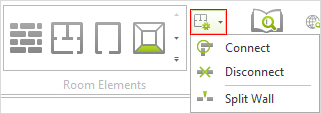
By a click on it, a dialog will open. It includes the commands Connect, Disconnect and Split Wall.
To connect individual walls, mark them at once (by pressing Ctrl and clicking each one of them) and then click on Connect. The two shots below illustrate how it is done.
|
|
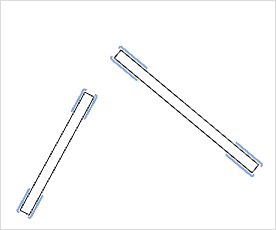
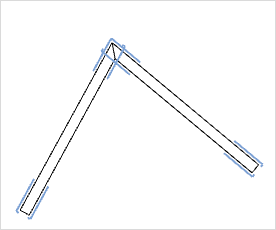
The function can be used to connect any number of walls at once. It is, however, necessary that an intersection between the walls is physically possible.
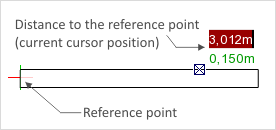
The Split function will segment a wall at a certain point. It will then be possible to edit the divided sections individually. This is how to split a wall.
1.Select the wall to be split. 2.Select the Split Wall item. which is obtained by clicking on the wall operations button (marked in red in the screenshot above) in the Room Elements group on the Start tab. 3.Now use the mouse or the keyboard to set the point at which you wish the split to be made. The reference point (zero point) is set at the beginning of the wall as a means of orientation. The next two diagrams show how a 4-meter wall is split after 3m. |
|
|
Properties in the Properties Editor
|
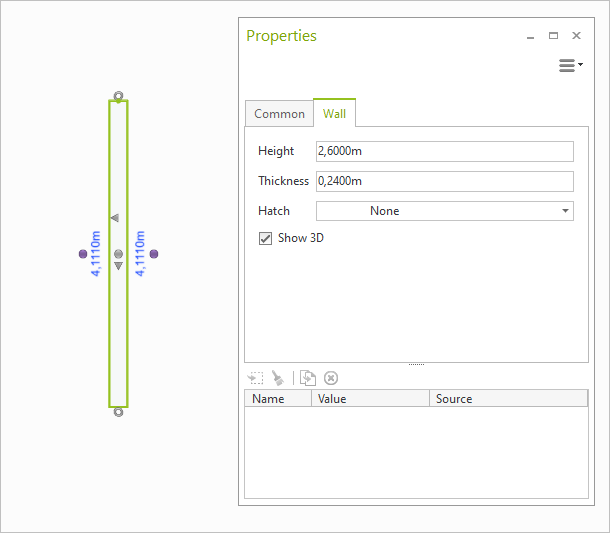
When you have selected a wall, you can edit some of its properties using the Properties Editor, which is opened by means of the Properties button on the Edit tab, Object group or by pressing the F12 key. The table below lists and describes all the properties, showing the procedure for changing each one. |
Wall Properties |
Description |
Can be edited by means of |
Heigh |
Height of the wall |
Dimension figure on the object, Properties Editor, interactor |
Thickness |
Thickness of the wall |
Dimension figure on the object, Properties Editor, interactors |
Position |
Alteration of wall position |
Interactor |
Lateral distance from neighboring objects |
Distance from other objects or from ends of walls |
Dimension figure on the object |
Hatch (not visible while Show 3D) |
Allocate wall with hatching |
Properties Editor |
Hatch Scale (not visible while Show 3D) |
Number of lines and the distance between them for line based hatches |
Properties Editor |
Show 3D |
While disabled, walls are shown in 2D |
Properties Editor |
Name |
A name can be given to each wall. |
Properties Editor |