Article List (pCon.planner Pro)
The article list summarizes the commercial information and configurations of the articles in your planning. Creating the article list in pCon.planner is just as possible as exporting it to pCon.basket or to an external file format.
Creating an Article List in pCon.planner
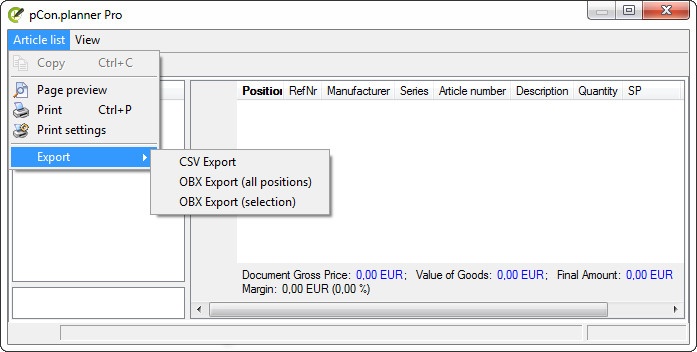
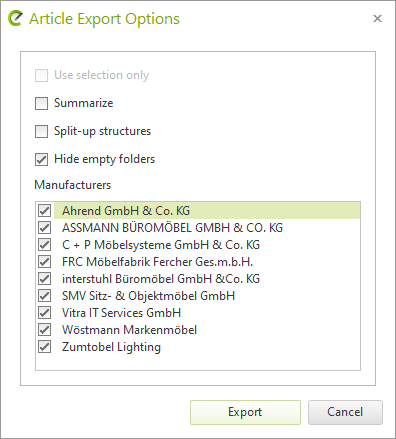
Generate the Article List directly via the Article List button on the Toolbar or on the Articles tab. After clicking on the button, select whether all articles in the planning should be part of the list or only the current selection of articles (image below). You can also specify whether identical articles should be grouped together, whether hierarchies should be dissolved and empty folders should be hidden.
Note: Via the Article List it is possible to select a manufacturer from your current drawing. This allows you to generate an article list with the data of a specific manufacturer, suitable for transfer to manufacturer-specific ordering systems. Unlike articles, models are not part of your article list. To integrate them into the Article List, they must be converted into articles. |
|---|
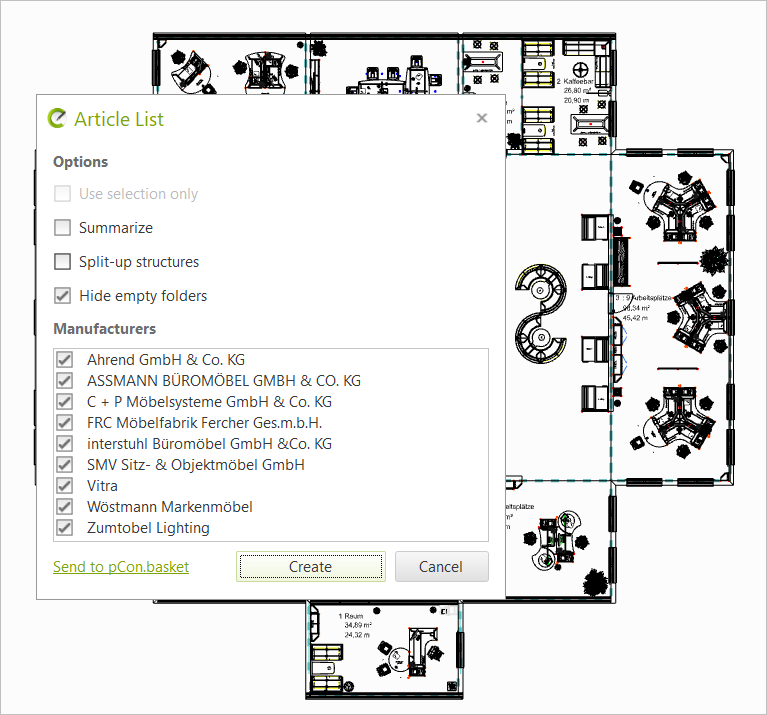
The following options are available for the Article List:
Option |
Description |
Export selection only |
Only articles selected in the planning will be exported to the Article List. |
Summarize |
Summarize identical articles in one position. |
Split-up structures |
Display the components of composite articles (e.g. meta types with child articles) as individual main positions. Note: This operation leads to a loss of relational information. For the export to the OBX format we recommend deactivating this option to prevent a loss of information. |
Hide empty folders |
Omit folders created in the Article Explorer as long as they do not contain articles. |
Send to pCon.basket |
Open the Article List directly in pCon.basket. Via the Program Settings, Calculation tab, you define whether the Article List is opened in the PRO edition of pCon.basket Online or in the offline version of pCon.basket. |
Manufacturers |
Select Articles for the Article List by manufacturer. By default, all manufacturers are selected in your drawing. If you do not want to include the articles of a manufacturer in the Article List, remove the checkmark in front of the respective manufacturer. |
When the OK button is clicked, the Article List will open as seen in the next screenshot.
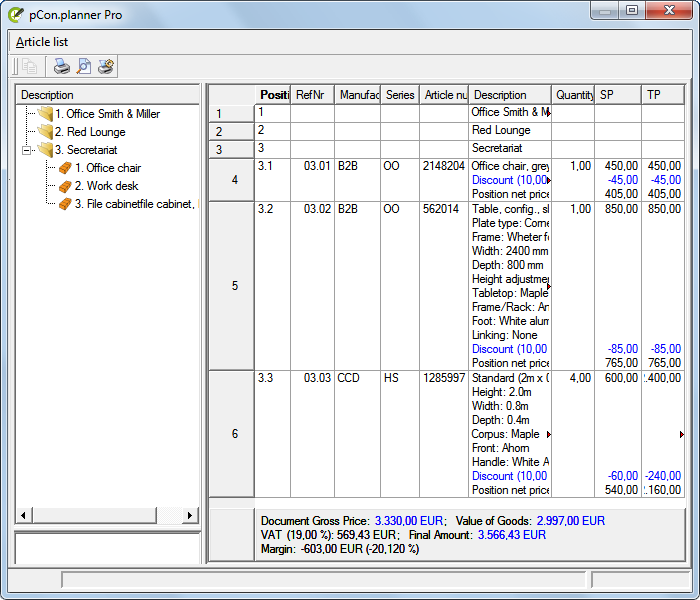
Types of Articles contained in the Article List
Icon |
Position |
Description |
|
Folder |
For structuring; contain other folders or articles |
|
Article |
Two kinds of articles are available: |
|
Standard Article |
Contain standardized OFML properties |
|
Metatype Article |
Contain meta properties as enhanced article settings |
|
User Article |
Article generated via Create User Article |
|
Set Article |
Similar to folder: can contain additional information like quantity, manufacturer, product line etc. |
|
The Copy article list button on the Start tab, Clipboard group under the Copy entry allows you to copy the Article List so that you can insert it in the pCon.basket and edit it there. |
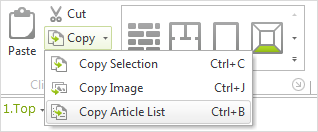
Note: The Article List is pasted from the clipboard into your project in pCon.basket Online via CTRL+V. |
|---|
|
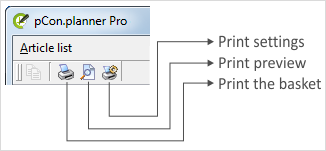
When the Article List has been created it can be printed. The buttons in the upper left area of the Article List window are available for this (see screenshot on left). |
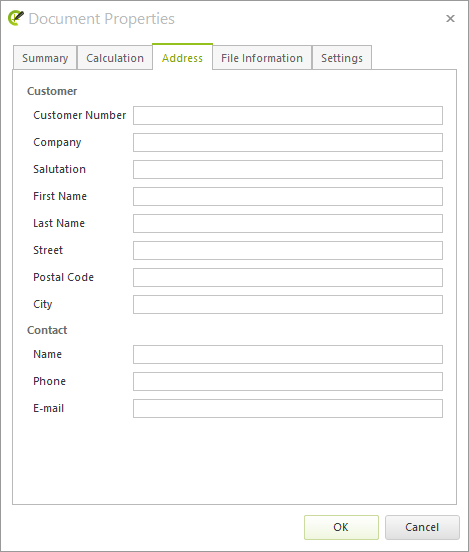
The settings for the print form are described below. The Calculation and Address details described in the Document Properties will directly affect the creation of the form.
After you have clicked the button for creating a print form, the window shown in the next illustration will open.

In the Form settings tab there are various options for individual adaptation of the form for printout. There are several templates (shown in the Form type field) but you can also decide for yourself the elements to be contained in your form.
The Text tab enables Front text and End text (such as Terms and Conditions of Business or license texts) to be typed in or other files which are required for your form to be loaded. Clicking on the OK button closes the dialog. Now by clicking the relevant button you can either print the form or export it as a file.
Here is a sample form with the individual elements numbered and marked out in red. The numbers appear again in the table below, explaining the elements of the form.
As an aid to understanding, only one of the chairs used in the design which the form illustrates has been used.
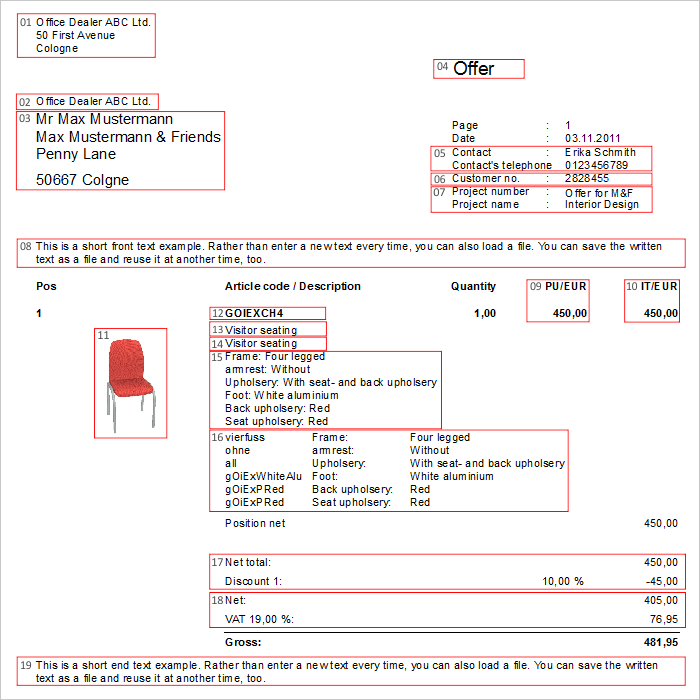
01 |
Dealer address (long) |
This address can be edited in the settings for the printed form, on the left-hand side of the page (Dealer address, category Print). |
02 |
Dealer address (short) |
This address can be edited in the settings for the printed form, on the left-hand side of the page (Dealer address, category Print). |
03 |
Customer name |
This can be selected as an option in the settings for the printed form (Form settings tab). It can be edited in the Document Properties (Customer tab). |
04 |
Form title |
This can be selected as an option in the settings for the printed form (Form settings tab). |
05 |
Name and Phone |
These can be edited in Contact among the Document Properties (Customer tab). |
06 |
Customer number |
This can be edited in the Document Properties (Customer tab). |
Project number/Project name |
These can be edited in Title and Subject among the Document Properties (Summary tab). |
|
08 |
Front text |
This can be selected as an option in the settings for the print form (Texts tab). |
09 |
Single price (position) |
This can be selected as an option in the settings for the print form (Form settings tab). |
10 |
Total price (position) |
This can be selected as an option in the settings for the print form (Form settings tab). |
11 |
Default image position |
This can be selected as an option in the settings for the print form (Form settings tab). If images of articles have been created using the Snapshot Tool they will be employed in the Article List. |
12 |
Article codes |
This can be selected as an option in the settings for the print form (Form settings tab). |
13 |
Short text |
This can be selected as an option in the settings for the print form (Form settings tab). |
14 |
Long text |
This can be selected as an option in the settings for the print form (Form settings tab). |
15 |
Variant text |
This can be selected as an option in the settings for the print form (Form settings tab). |
16 |
Features |
This can be selected as an option in the settings for the print form (Form settings tab). |
17 |
Discount |
This can be selected as an option in the settings for the print form (Form settings tab). |
18 |
Total price |
This can be selected as an option in the settings for the print form (Form settings tab). |
19 |
End text |
This can be selected as an option in the settings for the print form (Texts tab). |
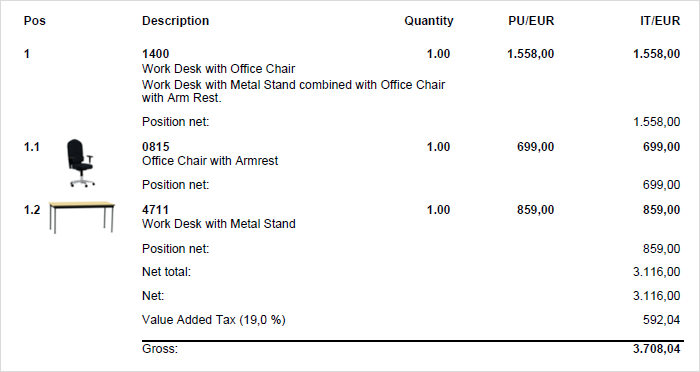
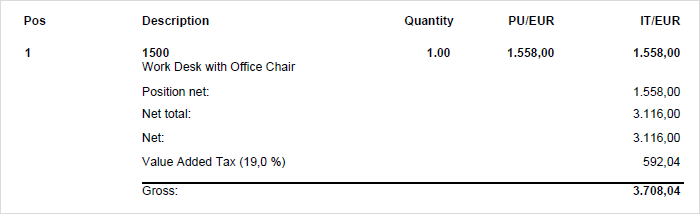
Representation of Set Articles in the Article List
The context menu in the Article Explorer offers the option Show Content to enable the representation of sets in the Article List and in the offer form to be controlled.
If this option has been enabled, the articles assigned to the set will be displayed as a drop-down box. If it has not been enabled, the articles will be hidden and the set will be displayed on the Article List and the form in reduced mode.
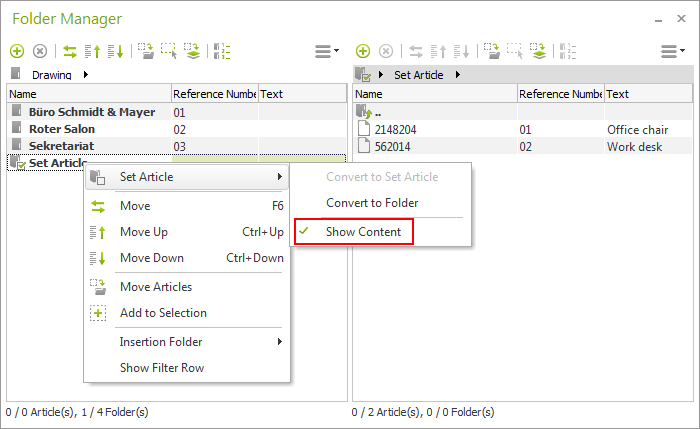
The two following screenshots will make it clear how this affects the way sets are displayed: The upper shot is of an open set on the price quotation form and the lower one shows an unopened set.
On the left hand side of the page in the Settings dialog, the configuration options for the different export formats applicable to the Article List are to be found. Clicking on the OK button closes the dialog. The form is exported via the Article List window (see next screenshot).
Note: It is also possible to export the article list without creating it directly in pCon.planner. In the following sections you will learn how to export article information to the individual formats. |
|---|
Export Article List as OBX File
This is possible either from the article list or from the application menu. Open the application menu. Click on Export. Select the option Articles. In the opening export dialog select File Type: OBX.
Export Article List as CSV
Open the application menu. Click on Export. Select the option Articles. In the opening export dialog select
•CSV (*.csv)
•CSV Archive (*.zip)
Export Article List as OBK File
This is possible from the application menu. Open the application menu. Click on Export. Select the option pCon. In the opening export dialog select File Type: OBK.
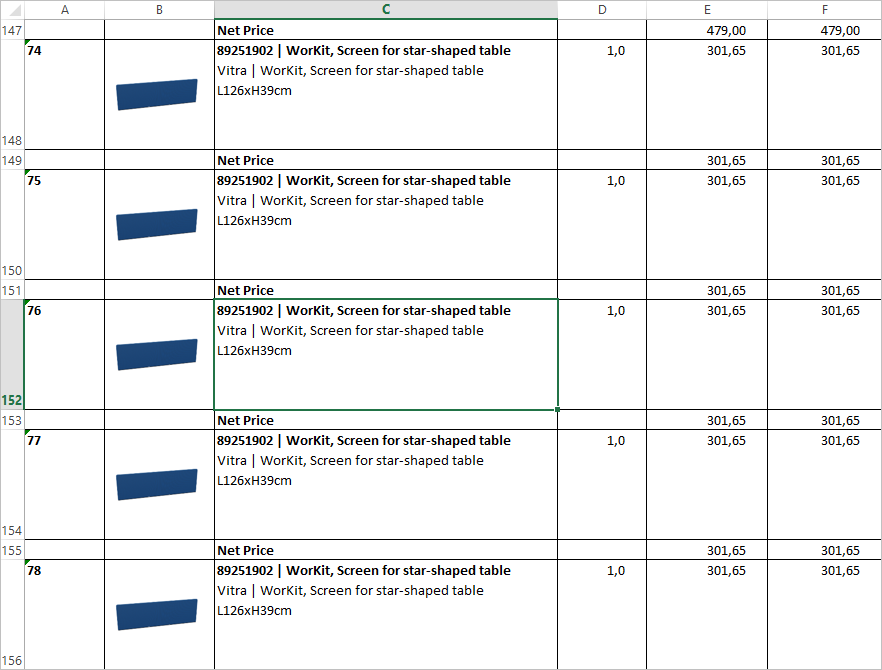
Exporting Article List to an Excel Chart
Furthermore, you have the option to export the articles to a Microsoft Excel file.
Open the application menu and select Export. Click the Article option. In the export dialog that opens, select File Type: Microsoft Excel, specify the location and file name, and confirm with Save. This opens the Article Export Options dialog. Here you have the same setting options as when creating an article list. Make your settings for hierarchies, selection, manufacturer, etc. and confirm with Export. |
|
An XLSX table is generated as in the following image example.