Animations
Animations can be used, for example, to simulate a flight over a planning scene or to allow a detailed "tour" of rooms.
pCon.planner has a dynamic tab to enable animations to be created and edited. This is opened by clicking on the Animation button in the Presentation tab, Media group.

It will not be possible to select and edit objects in the design when the Animation tab is open. This means that you can concentrate fully on creating the Animation and avoid accidental operations.
|
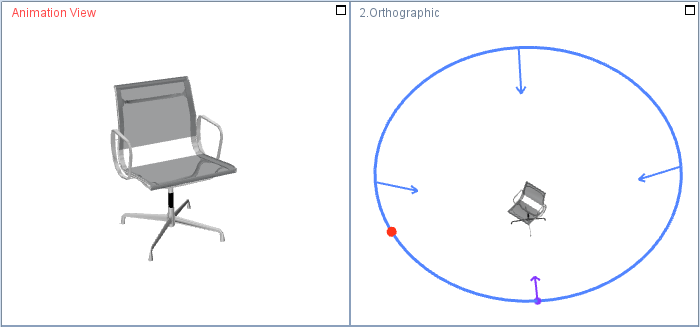
Use multiple viewports (Status Bar). For example, use view One + Two with one large and two small viewports. You can use the Top and Front views and a Perspective view to draw your animation. As soon as you open the Animation tab, the perspective view is automatically switched to the animation view. In the animation view, play your animation and check the view from a selected position. You can switch any viewport to animation using the view control (left image). |

Animations are created in pCon.planner using positions which are edited interactively.The positions are connected to each other via a path. Two types of animations exist:
Type |
Properties |
Positions are generated automatically and arranged in an imaginary circle |
|
Positions are placed individually within the planning and will automatically be connected by an animation path |
Creation of Animation Paths
Option 1: Add Position
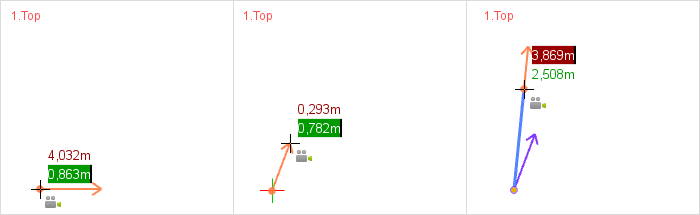
An Animation path is created using positions. Clicking on the Add Position button enables you to start drawing.
|
|||||
1. |
First click establishes the start position for the path. |
2. |
Set the viewing angle from the position set in the first step by moving the mouse. Confirm with click. |
3. |
Set the next position with the next click. |
|
|||||
4. |
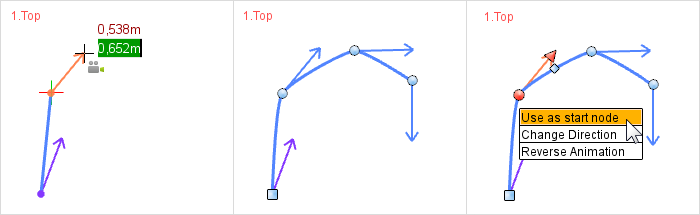
Set the viewing angle for this newly established position as in step 2. You carry on the creative process, finishing with Esc. |
5. |
The example path has four positions. Start position: square icon. All other positions: round icons. |
6. |
To change the starting position for the animation you first have to select the desired position, then select the Use as start node item in the context menu. |
|
|||||
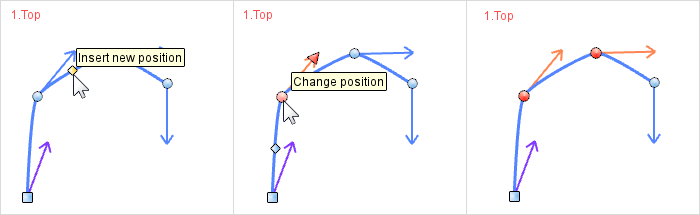
7. |
It is possible to insert new positions between existing ones by clicking with the mouse. |
8. |
Selected positions are highlighted in red. If a position has been selected, its location and line of view can be modified with the aid of the red interactor. |
9. |
By selecting any particular positions and using the New/Duplicate Animation item it is possible to create new custom animations. |
Option 2: Add View Position
The following procedure is particularly suitable for simulating a tour through closed rooms.
1.Set a Perspective view.
2.Use Zoom, PAN, etc. to navigate to the point in your planning where you want to start.
3.Click the Add View Position button on the Animation tab. A position will be created for your animation.
4.Repeat steps 2 and 3 until they reach the end position of your animation.
Use Current View for a Position
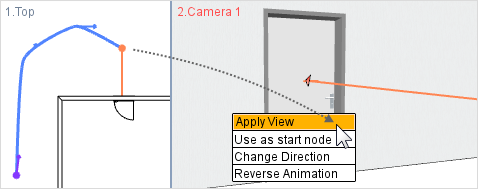
To set a position that has already been created in an Animation to a particular projection, such as a Camera, this is what to do.
|
|
||
1. |
First select the position which is to have the view modified. |
2. |
Move the mouse into the viewport which contains the projection you wish to transfer to the position you have selected. Use right mouse button to open the context menu. Select Apply View, which has the effect of assigning the current view to the position. |
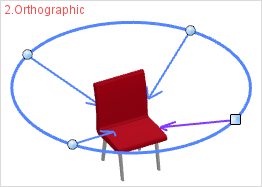
1.Open the Animation tab. 2.Click on the New button in the left section of the Animation tab and then select the Circle Animation item. 3.The next click in the design establishes the point around which the Circle Animation will revolve. 4.Move the mouse to decide the radius length for the Animation circle or enter values for Target Height and Eye Height directly via the keyboard. 5.One more mouse click ends the process. |
|
As in the case of Animation paths, there is also the possibility of subsequent editing of positions and their line of view.
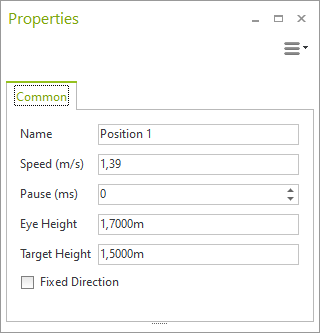
|
When you have selected one or more positions, you can edit a variety of their properties (see screenshot on left), such as Eye Height, Target Height, Speed and Pause. If Fixed Direction is set for a position, the line of sight will be maintained during movement to the next position and only altered when it is reached. |
|
If the Properties Editor is opened while no position is selected, you will see the properties of the Animation as a whole. Depending on what you have set, the path will be computed as either Straight, Smooth or Curved. The Closed Path option serves to connect up the last and the first position of the Animation. |

|
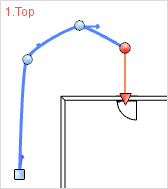
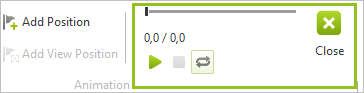
In order to play back animations, go into the Animation tab. Clicking on the Play button will start the playback within a viewport. |
|
|
It is only in Perspective and Animation View projections that you can see animations in a viewport. The playback for an Animation in 2D projections is visualized by a moving red dot (see the right-hand section of the screenshot above). |
|
Animations can either be calculated directly in pCon.planner as compressed video or passed on to EGR-BatchRendering and then compressed and edited in an external video program. The external video calculation can run comfortably in the background while you continue working in pCon.planner.
Processing Videos with pCon.planner
Note: Animations calculated with EGR-BatchRendering cannot be converted to a video in pCon.planner.
|
1.Calculate your animation using the Video button in the Presentation tab. 2.When finished, click the Save As button in the dialog. 3.In the dialog that opens, select the entry Video files under File type and enter the desired file name.
|
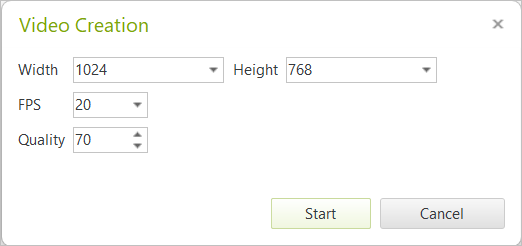
4.After clicking the Save button, the Video Creation dialog opens. Here you can define your video parameters like FPS (frames per second) and Quality.
5.Click Start to process your video and create an *.mp4 video file.
6.After your video is ready, you can either open the folder where it is saved or play it with an external video program.