Selecting Objects
|
Display of the Object Interactor Rendering of the Selection for Reference Objects |
Note: On our Youtube channel you will find a video on this topic |
||
|
|
The selection of one or more objects forms the basis of every interaction in pCon.planner. From designing rooms, arranging furniture or moving the entire design in the planning - this video will guide you through various interaction concepts that will help you make your projects more precise. |

The selecting or marking of objects is prerequisite to the use of certain tools and functions. All objects within your plan can be selected individually. In addition, it is possible to select multiple objects at a time. This allows you, for example, to move several objects at once. The number of objects selected is displayed in the left part of the status bar.
Multiselected Wall- and Room Elements as well as Drawing Elements of the same type can be edited together following multiselection. Use the Properties Editor to give a selection of walls a new height or to change the width of several windows at once.
Note: You cannot edit multiselected groups or OFML articles together. To select and edit several elements within a group, open the group. Change the properties of larger numbers of OFML articles by properties transfer.
|
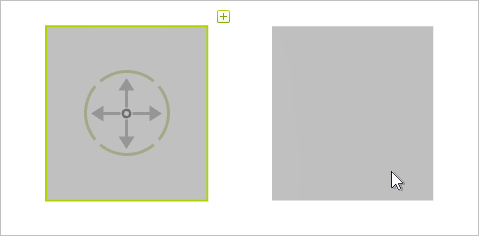
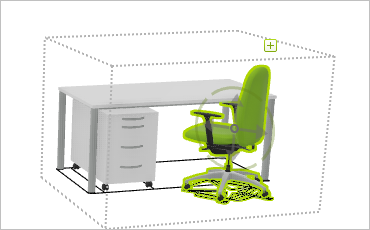
Like displayed in the image, the edges of selected objects are highlighted in a given color. The left-hand rectangle has been selected, but not the right. Reference Objects are highlightedin a different way, as well as,for pCon.planner Pro, OFML Articles and Set-Articles. |
Display of the Object Interactor
|
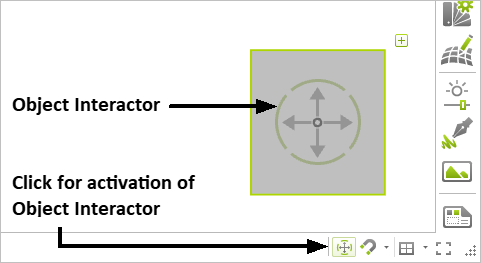
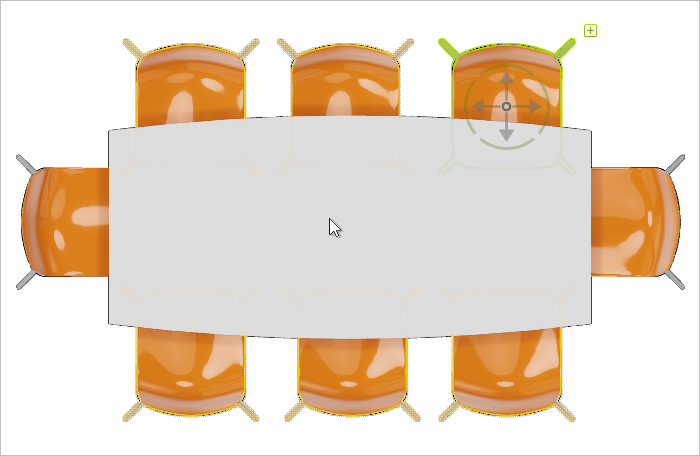
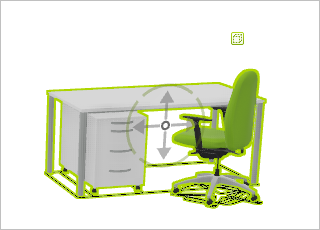
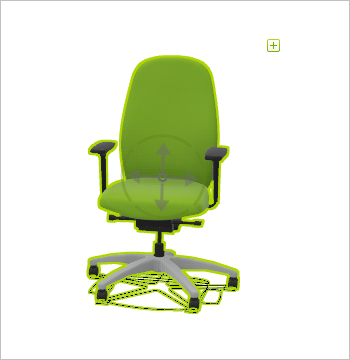
If an object is selected, not only the colored edge highlighting for the object will appear, but also the object interactor (see illustration on left). This is enabled by default. It can be switched on or off using the interactor button on the Status Bar. Objects can be rotated and moved using the object interactor. You will find further details in the Object Interactor chapter.
|
Rendering of the Selection for Reference Objects
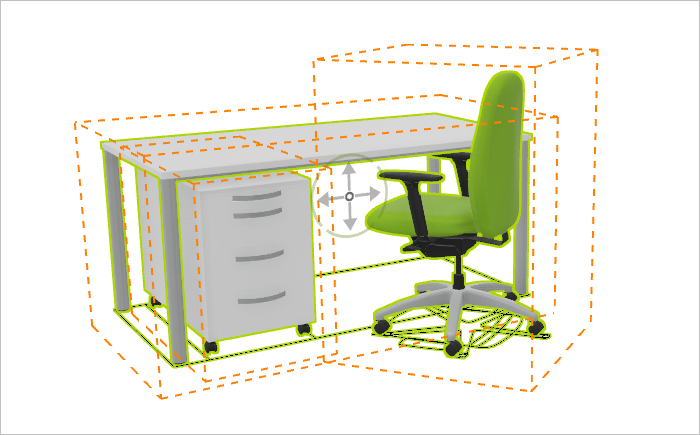
If a reference copy is selected, all objects that refer to the same reference are automatically highlighted in orange. This way, the user knows which objects reference each other within a planning.
If what has been selected is a group rather than a single object, the fact will be indicated by the group icon (![]() ). It is possible to select an object within the group without first ungrouping. There are two ways of doing this.
). It is possible to select an object within the group without first ungrouping. There are two ways of doing this.
Option 1
|
|
1.Select the group. The ( |
2.Groups that have been opened are given a dotted grey line as a frame to show the selection. Then you can select individual items from the group. Their edges will be highlighted. |
Option 2
Double click on a face or an edge of an object within a group to select it. In the case of nested groups, the whole group belonging to the object is marked with the first double click and a further double click goes one layer deeper.
Rendering of the Selection for Articles (pCon.planner Pro)
There is an additional possibility of marking objects in the case of articles. It becomes apparent when the relevant article is opened either with a double click or the edit symbol (![]() ).
).
|
|
Selected article. |
Article when opened. The additional dotted grey marking shows the user that the object has now been opened and can have its features edited. |
This is where to find out more about articles.
Selecting Set Articles (pCon.planner Pro)
As many articles as you like can be combined into a particular set. When a Set Article is selected, it will be highlighted in orange (see image below).
The relevant article provides more details of how to manage Set Articles and their functions.
With the Render Settings you control the appearance of your selection. Open the View tab and click the arrow in the Render group. The Render Settings dialog opens. On the Rendering tab of this dialog, you can set the Color of the selection highlight. You can also define whether the pCon.planner should display an additional bounding box for multi selections in addition to the colored edge highlight.
If you uncheck Use Outline Selection, selected objects are marked with the former blue selection frame instead of colored edges.
Single Selection by Mouse Click
Objects are selected at their edges or surfaces. Simply clicking on them will select the object.
For selection of separate items pCon.planner provides Snapping Points, which appear on the object when the mouse is moved over it.
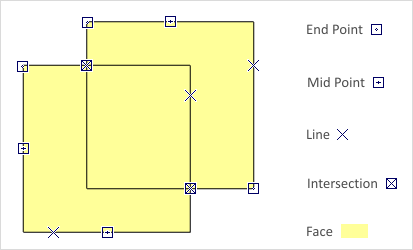
The following screenshot shows two superimposed rectangles.
|
Depending where the cursor is on an object, the Snap Point will appear as an icon. To clarify this, the figure on the left has not had all snap points added graphically. If the cursor is on a surfac of the object, there will not be an extra icon visible. Snap Points are particularly valuable when aligning objects. |
If a number of objects are to be selected in succession, press the Ctrl key and hold it down while selecting the objects. This procedure will allow you to select any number of objects in a design at once.
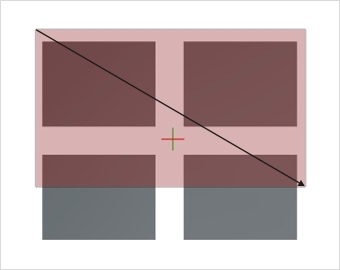
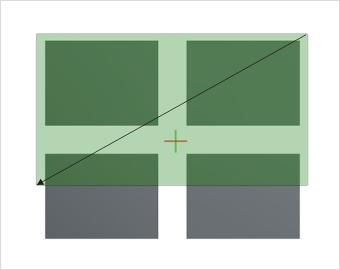
To select a number of objects at once, you can use the mouse to create a marked area. This means clicking in a viewport and holding the mouse button down while you drag the mouse to create the area selected. Depending on where the creation of this area is started, it will appear highlighted in either red or green.
|
|
If you start on the left and drag to the right, the area will be highlighted in red. All objects fully within this area will be selected when you have released the mouse button. In the screenshot: only the two upper rectangles will have been selected on releasing the mouse. |
On the other hand, if you drag the mouse from right to left to create the selection area, the highlighting will be in green. All objects that have been touched by the green area will be selected on releasing the mouse button. For the example: all four rectangles would have been selected. |
Selecting with Keyboard Shortcuts
•Ctrl+A: will select all objects in a design.
•Ctrl+I: will deselect any objects already selected and select all those which had previously not been selected.
•Esc: cancel a selection.